I’ve written a new tutorial on how to change your DPI system wide with or without root. If you’re interested in doing that, head over to this tutorial.
If you’re already rooted it only takes a couple of minutes.
One reason you may want to change DPI on a per app basis instead of system wide is that you may not want all apps at the same density. Let’s say for example you wanted Hangouts to display more lines of chat on the screen at once, or your Gmail so you can see more emails in your inbox at a glance, but you want to keep your homescreen and other apps at stock density — Here is the tutorial to help get it accomplished.
This tutorial is for all rooted China phones and tablets, including MT6592, MT6582, MT6572, MT6589, MT6732, MT6752, MT6595, as well as all rooted big brand models such as from Samsung, HTC, Sony etc…
This tutorial is easy to follow and most anyone who’s rooted with a ROM that has a Framework that isn’t heavily modified should be able to do it. It looks like a lot of steps because I’ve documented each little move to make it as simple as can be. If you’re already rooted it only takes a couple of minutes.
If you’re not rooted, please try this root method. If it doesn’t work, head over to the forum to try the other root tools. If they still aren’t working for you, you can try to create your own CWM and root via recovery. Sound complicated? Don’t worry, just take it one step at a time. 95% of people who follow our methods are successful at getting their phone rooted.
Note before you start: Installing Xposed can brick you. Any mods you attempt on your phone are your own responsibility. That being said, Xposed should work on all relatively stock versions of Android. Custom ROMs are okay as well as long as they’re based off of stock.
- Get rooted (see links above)
- Install Xposed framework. You can follow the tutorial here on the forum. Xposed Framework is what makes it possible to easily modify your phone.
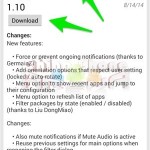
- In Xposed main menu, tap “Download”

- Tap the search icon >> search for “App Settings” >> tap it

- Swipe left to the heading “Versions” >> Download the latest version of “App Settings”

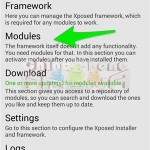
- Hit back button until you’re at the main Xposed menu >> Tap “Modules”

- Tap “App Settings” *checkbox* to enable the module. Note: Tap the checkbox here. Tapping the words will open the module, not turn it on.

- Tap back button >> tap “Framework” >> Select “Soft reboot”
- Open “App Settings” module through your app drawer, *or* open Xposed app >> “Modules” >> “App Settings” words (not checkbox)

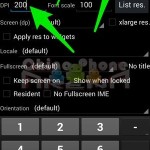
- Select the app you would like to change DPI settings for >> tap the “Off/On” switch at the top center
- Choose a density in the upper left corner. Typical DPI are 140,160,180,200,220,240

- Tap the disk icon to save
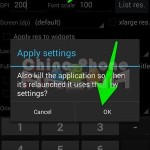
- Select “Ok” to kill the application so it will open fresh with your chosen DPI next time you open the app

Extra: By setting “Screen (dp)” to 600×1024, 800×1280 or 1000×1600, you should get a tablet interface for the app you’re modifying settings for.
Bam, you’re done. Experiment with your apps and see which fits each app and your eyes best. There’s no correct or recommended DPI, it will depend on the size of your phone, the app, and what you’re eyes are comfortable with. The great thing here is that you don’t need to reboot your phone every time you make a change.


Leave a Reply