Root TWRP Helio P25 MTK6797CD and Helio P20 MTK6797CH Vernee Mix 2 TWRP download and Vernee Mix 2 root
This guide will help you install TWRP and root MT6757 and MT6797CH / MT6757CD Vernee Mix 2, the first step is to install TWRP custom recovery on the MTK6757 Helio P25 Vernee Mix 2. The process contains quite a few steps, but most of them take just a few seconds.
If it looks daunting, don’t worry, take each step one by one and you’ll come through booted into TWRP on your Helio P25 MT6757CD Helio P25 / MT6757CH Helio P20 Vernee Mix 2 within just a few minutes.
Prerequisites and notes
- TWRP has been compiled by Cleopatra, and root is possible. However, there are still issues with injecting files into System from within Android.
Root functions which only require root shell permissions are working without issue. For example, Xposed, GravityBox, gsam root permissions, system-app root uninstalling, and the like, are not a problem.
In addition, TWRP functions such as mount, install .zip, wipe, restore, and backup, are all working without issue.
- This TWRP was ported by Cleopatra. All credit to her for her excellent work. The root functions are believed to be an issue with the Vernee ROM, not a failing of Cleopatra’s TWRP
- Backup anything you don’t want lost (important images, documents etc…) to your PC or a TF SD card. Just in case some issues arise
1. Download and extract the Vernee Mix 2 root pack. It includes:
- Auto installer for adb commands, adb drivers and fastboot commands– These are the tools that will allow your PC to communicate with your mobile.
- Vernee Mix 2 TWRP– The MTK6797 and MTK6797T Vernee Mix 2 custom recovery used for rooting and flashing custom ROMs onto Vernee Mix 2.
- Vernee Mix 2 root SuperSU.zip– The SuperSU.zip used for rooting MediaTek MT6757CH Helio P20 and MT6757CH Helio P20 Vernee Mix 2 through TWRP recovery.
2. Install the adb drivers and fastboot commands
- Extract the above download.
- Run “adb-setup.exe”.
- Hit “Y” to all 3 questions.
- The Google adb driver installer will then popup. Go ahead and allow and install.
3. Unlock bootloader Vernee Mix 2
- Settings >> About phone >> Tap “Build Number” seven times. You will see “You are now a developer”
- Hit the back button. You will now see a new option in Settings — “Developer Options”
- Turn on the developer options
- **In the Developer Options, Enable OEM Unlock (see video)
- **Enable USB debugging
- Plug your phone to PC via USB cable
- You should then see a pop up request on your Vernee Mix 2 to give your PC USB debugging permissions. Go ahead and allow
- SKIP THIS STEP (STEP 3.8) FOR NOW, ONLY FOR DEVELOPERS AND TESTERS — Copy the SuperSU.zip from the above download to the base of your Vernee Mix 2 or to micro-SD in your Vernee Mix 2
4. Copy the TWRP and open the command window
- Open Windows Explorer and go to “c:/adb”. This folder was created when you installed the Fastboot and ADB command set
- Copy the Vernee Mix 2 TWRP (recovery.img) to “c:/adb”
- IN A BLANK SPACE (not on a filename etc…), hold SHIFT while RIGHT-CLICK
- Select “Open PowerShell window here”. You should then see a small black window open
5. Boot into bootloader and fastboot flash the TWRP
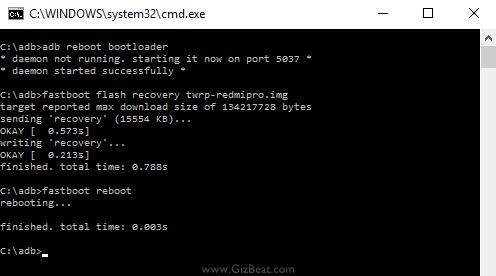
- In the black command window type “adb kill-server” and hit enter
- Type “adb start-server” and hit enter
- Type “adb reboot bootloader”. Hit Enter. Wait about 10 seconds and you should then see your Vernee Mix 2 says “fastboot” at the bottom left
- Alternatively, you can Power-Off the phone, then Power-On while holding Volume-Up. You will see a three option menu. Here Volume-Up cycles through the selections and Volume-Down selects. Press Volume-Down when the arrow is pointing at Fastboot.
- In the black command window on your PC, type “fastboot boot recovery.img”. Hit Enter.
- It should then boot into TWRP. It all takes just a few seconds.
- Note, in the video it’s slightly different. In the video we are permanently flashing the TWRP.
6. TWRP encrypted password and change language
- When first booting into TWRP you may see a message about the phone being encrypted. Tap Cancel
- You will then see Russian language with a slider at the bottom
- Change the language by tapping the button on the right
- Slide the slider
7. Use TWRP
You are now into TWRP and able to perform such functions as:
- Vernee Mix 2 backup MT6757
- restore
- mount
- sideload
- install .zips
8. Root your Vernee Mix 2
ROOTING VERNEE MIX 2 ONLY PARTIALLY FUNCTIONING. WE DO NOT RECOMMEND ROOTING AT THIS TIME
- TWRP main menu >> Install
- Navigate to whichever directory you copied the SuperSU.zip to.
- Select the SuperSU.zip
- Swipe to confirm the flash
Done! Good job. You now have TWRP and a rooted MTK6757CH Helio P20 / MTK6757CD Helio P25 / Helio P25 Vernee Mix 2.
If you have any issues, comments, successes or failures, or just want to say thanks, please comment in the comment section and let us know.


Leave a Reply