NOTE: Attempting the tutorial is done so at your own risk. Any time you modify your phone, the results are 100% your own responsibility. I recommend backing up any very important data, such as documents, pictures etc… to your PC or to the cloud prior to continuing. That being said, I’ve done this many times before without issue.
If you’re a veteran, you may only need to see steps 1, 4 and 5 and note you may need to use SP Flash 3.1344. If you’re a novice, you may want to read through all of the notes and steps.
Often it’s the case that a new ROM comes out, but it’s in SP Flash Tool format, or modifications have been made to the phone that make an OTA update not possible.
Usually the user is frustrated by this situation because it means starting over with installing apps, signing back into Gmail and chat accounts etc…
If rooted, it’s possible to backup all apps with their data and then reinstall when the new ROM has been flashed, but this also can be a long, frustrating process prone to failure.
Today I’m going to show you how to flash your MTK MediaTek Flash Tool ROM without losing your data and apps. In most situations it’s surprisingly easy and isn’t much different then how you would normally flash.
Even when switching over to a custom ROM or from a custom ROM, this tutorial is possible.
- The first thing we need to do is obtain the scatter for the ROM you’re on now. This usually can be obtained by using MTK Droid Tool and creating a scatter (opens in new tab), or by downloading the ROM you’re currently on and using the scatter from that.
- Why are we doing this? We’re trying to eliminate as many possible issues as we can. We don’t want to make this more trouble than it’s worth and indeed in the majority of cases, you can skip the above step and just use the scatter from the new ROM, especially if you’re upgrading from an official ROM to a newer version of the official ROM. However, in the unlikely event the ROM creator has made changes to where Android or different portions of the ROM are flashed, it can cause problems. For the parts of the ROM we’ll be flashing, it’s unlikely, but not out of the question, so it’s best to do as instructed in step one and acquire the scatter for the current ROM you’re on.
- The next step is to open SP Flash Tool. You can get the latest version at www.chinaphonearena.com (opens in new tab), however for our purposes, it’s sometimes required to use SP Flash version 3.1344. Why? Because of unfortunate failsafes inherent to the newer versions of Flash Tool, they may not allow the flash to take place.
- Load your scatter as you would with a typical ROM flashing. If you’re unfamiliar, you may want to see this thread for a bit more detailed info on how to flash a ROM (opens in new tab).
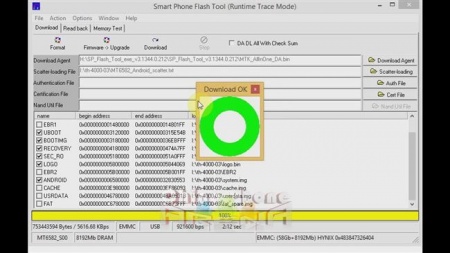
- This is where the magic happens. Deselect the following portions of the ROM:
- PRELOADER
- MBR
- EBR1
- EBR2
- CACHE
- USRDATA
- FAT
- And leave:
- UBOOT
- BOOTIMG
- RECOVERY
- SEC_RO
- LOGO
- ANDROID
- Why are we deselecting some and not others? What we want is the parts which form the Android system flashed, because these are portions of the ROM that may contain updates, but we don’t want to write over our user data or cache, which is the portion of the eMMC which contains our apps, pictures, movies, cache, data etc…
- We don’t want to write over our EBR either. This is the portion of a ROM that tells Android how big our partitions are. In many cases, especially with custom ROMs, the partitioning is changed by the ROM creator, in which case we will lose phone storage if internal storage is expanded, and likely lose internal storage and phone storage if shrunk.
- If you really wanted to simplify things further, you could deselect everything except for Android (system.img). However, occasionally there are changes made to the other areas in step 5 as well.
- Now that you’ve got the various parts of the ROM selected and deselected, remove the battery from your phone for a second, then put it back in.
- Click “Download” in SP Flash Tools. Then “Yes” to ignore the flash warning.
- Connect your phone via USB to your PC/Notebook.
- The preloader should trigger and you should see the ROM begin to download to your phone.
- Once it’s finished, disconnect your phone and power up. After a couple of minutes you should get the “Android is upgrading” toast notification as it goes through and optimizes each app. In some rare cases, you may need to clear cache. This can be done from within recovery or with a 3rd party app from Play.

Bam! You’re done. Don’t forget to let us know in the comments how this tutorial worked out for you, and if you have a bit of knowledge (or looking to gain some), come by the forum and share the love.


Leave a Reply