Blackview BV6000 TWRP and root MT6755 Helio P10 guide

For those looking to root their Blackview BV6000, the first step is to install TWRP custom recovery on the Blackview BV6000. The process contains quite a few steps, but most of them take just a few seconds.

If it looks daunting, don’t worry, take each step one by one and you’ll come through with a rooted Blackview BV6000 within just a few minutes.

1. Download

  • MTK MediaTek auto preloader drivers #1 pack– These are the drivers that will allow the MTK SP Flash Tool to communicate with your mobile. Try these drivers first, as they may eliminate the need to disable Windows driver signing. If you have any issues then use the #2 pack.
  • MTK MediaTek auto preloader drivers #2 pack – These are the drivers that will allow the MTK SP Flash Tool to communicate with your mobile
  • Download latest SP Flash Tool – This is the tool that will be used to flash Blackview BV6000 with TWRP
  • Blackview BV6000 root pack – This pack includes the Blackview BV6000 TWRP, Blackview BV6000 stock recovery, SuperSU.zip, and Blackview BV6000 scatter file download (20160608 MT6755_Android_scatter.txt).

[spoiler style=”steelblue” collapse_link=”false” title=”KNOWLEDGE POINT about scatter files. Click here to read”]NOTE: A scatter file is what tells SP Flash Tool where to flash various parts of the firmware on your phone’s EMMC.

This scatter came from 2016-06-16 Blackview BV6000 ROM. If you’re on a different ROM than 20160608, it’s extremely unlikely the recovery.img location will change, but there’s always a slim possibility of it.

If you’re at all in doubt, download the ROM that you’re currently on if you don’t already have it downloaded, and use the scatter from that.[/spoiler]

2. Install MediaTek MT6755 Helio P10 preloader drivers

If you don’t already have MTK Preloader Drivers installed, we’ll go through that step now. NOTE: If you get an unsigned driver error and can’t continue with the driver install, then go to step #3. NOTE: Use #1 pack or #2 pack. Do not need to use both.

[spoiler style=”steelblue” collapse_link=”false” title=’If MTK MediaTek preloader vcom driver pack #1, click here’]

  • Open the MTK adb vcom auto install driver pack #1 in WinRAR / unZip
  • No need to extract, double click DriverInstall.exe or installdrv64.exe for x64 bit Windows
  • Allow any permission requests
  • At the end you should see something like this[/spoiler]

[spoiler style=”steelblue” collapse_link=”false” title=’If MTK MediaTek preloader vcom driver pack #2, click here’]

  • Open the MTK MediaTek auto vcom driver install pack #2, and go to Win7_WinXP folder for 7 / XP, or Win8 folder for Windows 8 / Windows 10.
  • No need to extract, double click DriverInstall.exe
  • Allow any permission requests
  • When you see “Windows can’t verify the publisher of this driver software”, click “Install this driver software anyway”
  • At the end you should see something like this[/spoiler]

3. Turn off driver signature enforcement

Do this step if:

  • You don’t already have MediaTek preloader drivers installed

and

  • Getting error from Windows telling you drivers are unsigned and can’t be installed with pack #1 or pack #2

[spoiler style=”steelblue” collapse_link=”false” title=’Click for disable driver signature enforcement guide’]

To install preloader drivers, some users of 64-Bit Windows may need to disable Driver Signature Verification / Enforcement. This quick procedure will have you up and modding your phone in no time.

  1. Hold SHIFT while left-clicking restart. It’s the same for Windows 8.1 and Windows 10.
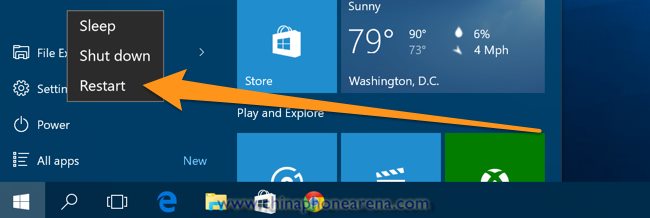
    disable-driver-enforcement-1
  2. Your computer will reboot and give you various options. Select “Troubleshoot”.
    disable-driver-enforcement-2
  3. Choose “Advanced options”.
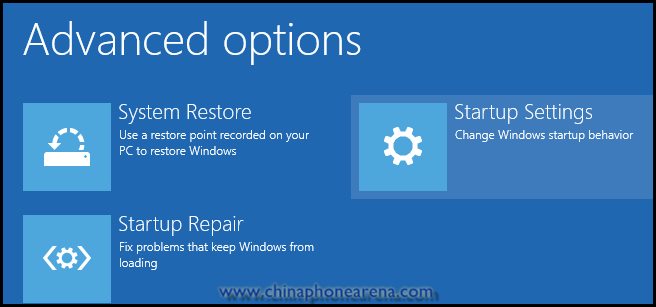
    disable-driver-enforcement-7
  4. Choose “Startup settings”.
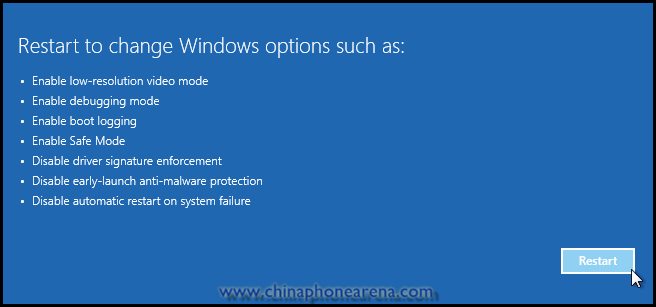
    disable-driver-enforcement-3
  5. Select “Restart”.
  6. Select “Disable driver signature enforcement”.
    disable-driver-enforcement-6

Your computer will now reboot into a mode which will allow you to install unsigned drivers, which is covered in the next steps.

Now go back to step #2 and install the MTK Preloader Drivers (GizBeat source)[/spoiler]

4. Install and run SP Flash Tool

  • After downloading the latest SP Flash Tool, extract it to a directory where you’ll know where it’s at.
  • Go to the extracted folder.
  • Right-click ‘flash_tool.exe’ and ‘Run as administrator’

5. Load the Blackview BV6000 scatter
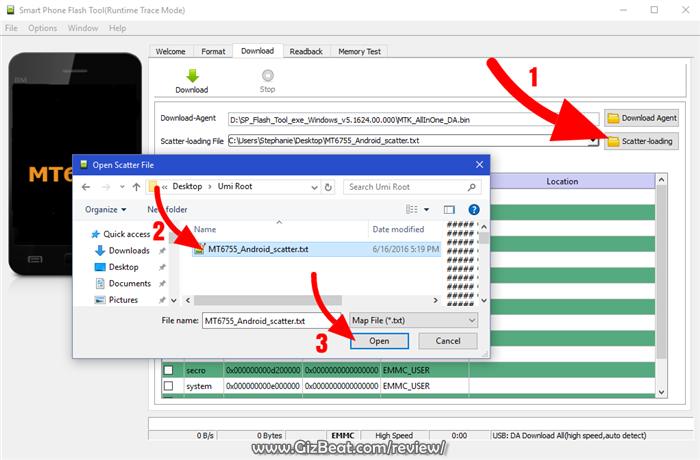
umi-super-root-umi-super-twrp-5

  • If you haven’t already done so, extract the Blackview BV6000 TWRP and root pack to a folder where you’ll know where it’s at.
  • Select ‘scatter-loading’ from upper-right of SP Flash Tools.
  • Navigate to the folder that you extracted the Blackview BV6000 TWRP pack to
  • Select ‘MT6755_Android_scatter.txt’
  • A checklist of different parts of the ROM should then show in the bottom portion of SP Flash Tools.

6. Select the Blackview BV6000 TWRP custom recovery
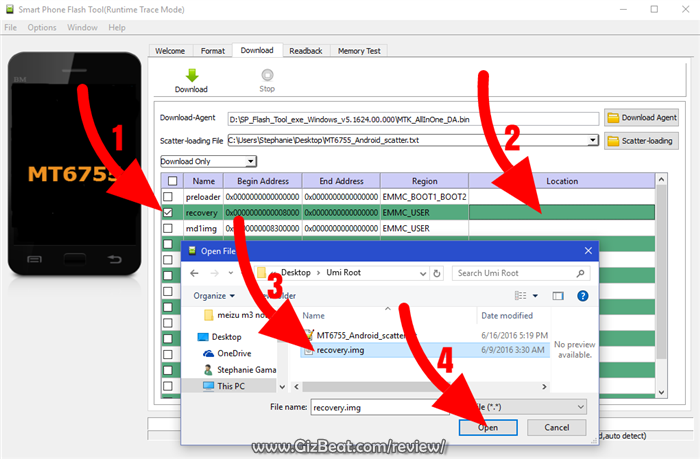
umi-super-root-umi-super-twrp-6

  • If anything is selected besides ‘recovery.img’, deselect them all except ‘recovery.img’
  • Double click the ‘recovery.img’ line in MTK SP Flash Tool (see video at 02:00)
  • direct SP Flash Tool to the previously extracted Blackview BV6000 TWRP (‘recovery.img’ in the Blackview BV6000 TWRP pack)

7. Flash Blackview BV6000 TWRP
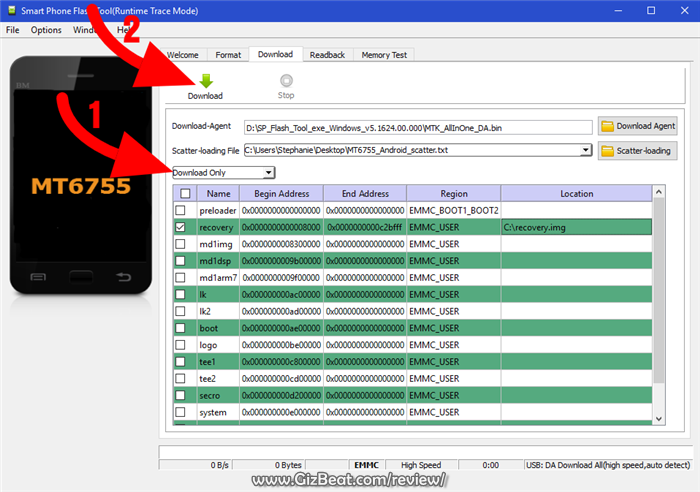
umi-super-root-umi-super-twrp-13

  • Make sure the phone is disconnected from PC and that your phone is powered off.
  • Make sure the box noted in the image above says ‘Download Only’
  • Select ‘download’ from the top of SP Flash Tools.
  • Connect USB cable to phone. Within a few seconds you should see a red bar come up. Wait a few more seconds and the flash should begin.
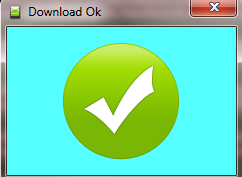
  • It will all be over in just a few seconds, at which point you should see a dialog from SP Flash Tools telling you the flash is complete.flash-okay-sp-flash-tool

8. Boot into Blackview BV6000 TWRP recovery and root

  • Disconnect your Blackview BV6000 from the PC.
  • Hold VolumeUp+Power until you see the Blackview BV6000 logo show, then release Power, but continue holding VolumeUp until you see the Blackview BV6000 booted into TWRP.
  • Flash / Install SuperSU.zip from the Blackview BV6000 Root pack.

Done! Good job. You now have TWRP and a rooted Blackview BV6000 MT6755.

If you have any issues, comments, successes or failures, or just want to say thanks, please comment in the comment section and let us know.

Comments

41 responses to “Blackview BV6000 TWRP and root MT6755 Helio P10 guide”

  1. Karfi Avatar
    Karfi

    If i click download in Flash tool, HOLD VOLUME UP and connect to USB cable, there is some “brom error – status preloader” and its no flashing, but with this error, device succesfully connect to PC (in system manager)

  2. hanseatic Avatar
    hanseatic

    I want to use the linux version of sp flash tool. Do I need extra MediaTek MT6755 Helio P10 preloader drivers and from where?

    Thnx

  3. Chooey Avatar
    Chooey

    Do I have to unlock the bootloader before installing the custom recovery or not? Your post does not say!

    1. Damian Parsons Avatar
      Damian Parsons

      Hello Chooey, no, you don’t need to unlock the Blackview BV6000 bootloader to flash TWRP. This is done through SP Flash Tool, not bootloader.

      Regards

  4. Lepool Avatar
    Lepool

    Hi, i hope this post are helpfully for everey,

    i have bricked one phone because the flash interrupted with an Brom Error. The good notice is , that i have bricked my phone. On the second phone the flash also interrupts because Flash tools was crashed,but the phone fortunately total funtionally. On the third attempt i disable my Avast Antivirus an TADAAAA the process was terminated successfully!

    Good luck
    Lepool

    p.s. sorry for my english :-)

  5. johnbars Avatar
    johnbars

    Hello and thank you for your guide !

    However, i faced a couple of problems and i would like to ask you about them.

    When i try to download the recovery.img the red bar appears but the flash tool (v5.1624) crashes. I tried it both with Win 7 (x32) and Win 10 (x64).

    I then used a more recent version of the flash tool (v5.1628) and everything worked fine, the recovery.img was flashed and after that i booted in recovery mode and TWRP came up, but the touch is not working so i cannot install the SU update.

    I also tried to install the SU Update with the stock recovery but i got an error about wron scatter file.

    Any suggestions ?

    Thank you in advance !!!

  6. Nicu Avatar
    Nicu

    Hello, i installed twrp on my device , everithing works except that when i enter twrp, it’s not responding, it’s not responding to any key press, and any touch,
    Can you tell me what can i do to install supersu?

    1. Evi1M4chine Avatar
      Evi1M4chine

      I have the same problem. For anyone who’s stuck in there. Hold power + volume up again for a couple of seconds and it at least shuts down, so you can get back into your system.

  7. zen Avatar
    zen

    Thanks for tutorial,
    Found problem like john and nicu,
    just update the spflash from the website, flash the twrp and cannot touch
    If the twrp is installed, just copy the SU to the sd or internal, then use the normal update (setting -> about phone -> wireless update -> 3 dots on the top right -> local updates -> and select the SU Zip file) it will then boot into recovery (TWRP) and install the SU.
    Hopes it helps

    1. Evi1M4chine Avatar
      Evi1M4chine

      Thank you very much1

  8. johnbars Avatar
    johnbars

    @zen

    Thanks for the suggestion.

    I tried it and it actually did tried to reboot in TWRP and install the .zip file but at some point on the installation it outputs something like:


    extracting ramdisk
    failure – aborting

    the phone reboots and no SU binary is installed.

    any other ideas ?

  9. Hartanto Hadinoto Avatar
    Hartanto Hadinoto

    I use version 20160822, when i have flash the twrp recovery with smooth, i tried to recovery mode but the phone dont want inside , just reboot system to a wake up phone.
    I changed to stock recovery and its normal work.
    Please your advice. Thank you

  10. JeX Avatar
    JeX

    There is no the file “recovery.img” help me please

  11. noraneko Avatar
    noraneko

    hi,

    installed everything like you said (used the second MTK pack and had to disable the driver signature enforcement) but when I connect my bv6000 my laptop keeps saying he can’t detect that usb-thingy. so I cannot flash it.
    any ideas?

  12. zentsang Avatar
    zentsang

    I did everything and got the “Successful” green check mark. However, rebooting the phone while holding VolUp + Power … then releasing Power but still holding VolUp after the “Blackview” screen… all I get is an Android with a red triangle “No Command”. I can never get to TWRP. I tried many time. Regular boot works fine. Any ideas why holding Power and VolUp are not working? My BV6000 build is 20161011.

    1. cowboy Avatar
      cowboy

      same problem here… and same build too…. please help….

  13. Chris Avatar
    Chris

    Hi,

    When you have a red triangle “No Command” you need to push the buttons Power + vol down in first time and in second time the vol up (While maintaining the first two buttons)and normally you have accès at the recovery system.

    Chris

    1. Chris Avatar
      Chris

      Hi,

      On the other hand for my part impossible to do the procedure above because the bootloader is locked and using the mode fastboot unlock bootloader, I have the instruction press Vol over for unlock but this one is not active, Anyone know how little you can do to unlock the bootloader without pressing up? Or can we install recovery TWRP without unlocking the bootloader with eg ALL-IN-ONE TOOL?

      Thanks
      Chris

      1. Damian Parsons Avatar
        Damian Parsons

        Hello Chris, this is one of the unfortunate traits of Helio P10. To our knowledge it is indeed impossible to do it without pressing VolUp, and MTK / MediaTek has cleverly or mistakenly remapped or removed VolUp in fastboot mode.

        Regardless, The TWRP is not flashed through fastboot. It’s flashed with SP Flash Tool. You will also need to boot directly into recovery after flash, otherwise the system will replace the TWRP with stock recovery.

  14. Chris Avatar
    Chris

    Hi,
    I have try by spflash tool but I have a red bar and after 3s spflash tool stop and mâle a error.I think with the bootloader lock I can’t flash,no?

    Thanks.
    Chris.

    1. Damian Parsons Avatar
      Damian Parsons

      No. A locked bootloader should not keep the flash from happening. We’ve personally flashed many MTK MediaTek phones with locked bootloaders and no problem at all. MT6755 included.

  15. Chris Avatar
    Chris

    Ok so why spflash tool stops !!! Because the drivers are installed, I see my phone under MTK Droid when it is turned on and off, I get it communicated with it in adb and fastmode. So to flash there is a particular way, I saw on some forum that it was necessary to put the phone in bootloader so that spflash tool starts to make the flash.
    Anyway I do not come despite the tutorial. For info I am under windows seven 64bits.

    Thanks

    1. Chris Avatar
      Chris

      For me to start in recovery, I press on power and volume up but for the bootloader how does it because if I do power volume down I go into factory mode.

  16. Karfi Avatar
    Karfi

    This not working on Android 7 nougat update. After flashing root, system is totally unstable and force quitting all the apps. I test is after backup in TWRP. ;) need new root file! :(

  17. XS Avatar
    XS

    Did everything as said, but I got the same problem as everyone else: TWRP touch does not work, and I cannot install SuperUser

    1. Chris Avatar
      Chris

      Apparently some people on the xda forum say they have installed superSu by doing local update (choose the next superSu.zip where it is) from the bv6000 update menu.

      1. XS Avatar
        XS

        I’ll try and see if it works. Thnx

      2. XS Avatar
        XS

        Tried, and it did not work> the phone recovery refused to install it

        1. Aron Avatar
          Aron

          Can you try to use computer mouse connected via OTG cable in TWRP and use a mouse instead of touchscreen? I read somewhere that it might work but can’t try it now…

          1. XS Avatar
            XS

            Thanks a million , Man! it worked, finally with mouse!

          2. angki Avatar
            angki

            this actually worked!!! thanks…use mouse with otg and flash from twrp

  18. Christophe Avatar
    Christophe

    Hi,

    I found why sp flash tool stops at the end of the red bar, I took the last version of sp flash tool and the flash is done correctly.
    Share against I have another worry, after the flash impossible to go into twrp and that by maintaining the flight + and power.Le phone restarts and hands over the stock recovery !!!! suddenly I wonder if the scatter provide in the Tuto is not at issue because my phone in the following version: BV6000-Blackview_V01_20161025-20161108-1812.
    How do I get the scatter of this version?

    Thanks

  19. Aron Avatar
    Aron

    OK I’ve got few questions – tried to do Root with newest SPFlash and this is what happened
    SPFlash did what it should do. I managed to go to TWRP but touch doesn’t work. After a restart of a phone – TWRP is no longer in phone and I can start from the begining.
    I think that trying to instal SU as local update fails because phone restarts and puts stock recovery instead of TWRP and the SU update doesn’t work. But this is not a problem. First question – I’ve heard that connecting mouse via OTG can work in TWRP. Is this correct? Anyone tried this?
    Second and more imporant – OTA 7.0 is waiting for me to install. What should I do? Can I try this manual after I install 7.0 via OTA? Or it won’t work? Some comments says that it won’t work.
    Or maybe try do to root while still on 6.x and then can I somehow put 7.0?
    Is 7.0 even worth something? I think that root is more important to me than 7.0 :)

  20. jman Avatar
    jman

    Thanks
    Followed all the steps and this worked for me.
    After installing SU in TWRP i rebooted, and did not wipe the cache.

  21. Karfi Avatar
    Karfi

    How about root on Android 7? It is possible? Thanks!

  22. ravee1010 Avatar
    ravee1010

    Root android 7 ??

    Is it possible to root android 7 ??

  23. Raptile Avatar
    Raptile

    Hello have anybody tutorial how to rood android version 7.0 ?????

  24. Tortelidroga Avatar
    Tortelidroga

    Rooted bv6000 with android 7 with this guide. Scatter file is not changed, use otg mouse in twrp and flash supersu version of this guide. Waiting for Nougat xposed. (:

    1. Tortelidroga Avatar
      Tortelidroga

      Search for the latest sptool or you get a win10 error at flash time. For a good work Disable Signature and install 2nd driver pack. CONNECT THE PHONE AFTER PUSH DOWNLOAD BUTTON!

  25. Toms Romans Avatar
    Toms Romans

    My computer doesn’t recognize phone although I did everything perfectly.

  26. Arthur Avatar
    Arthur

    I’m unable to root BV6000 with Android 7 and the latest hardware changes (LCD: FL11281, touchpanel gt1x, VER:0x82, …). I’m able to to into stock recovery but when I flash TWRP and boot it is not loading. I think an update for this TWRP is required, how to get it or do it myself?

Leave a Reply

Your email address will not be published. Required fields are marked *