How To Configure Proxy Settings on your Android
Some networks require certain proxy settings. This guide will show you how to configure your network’s proxy settings.
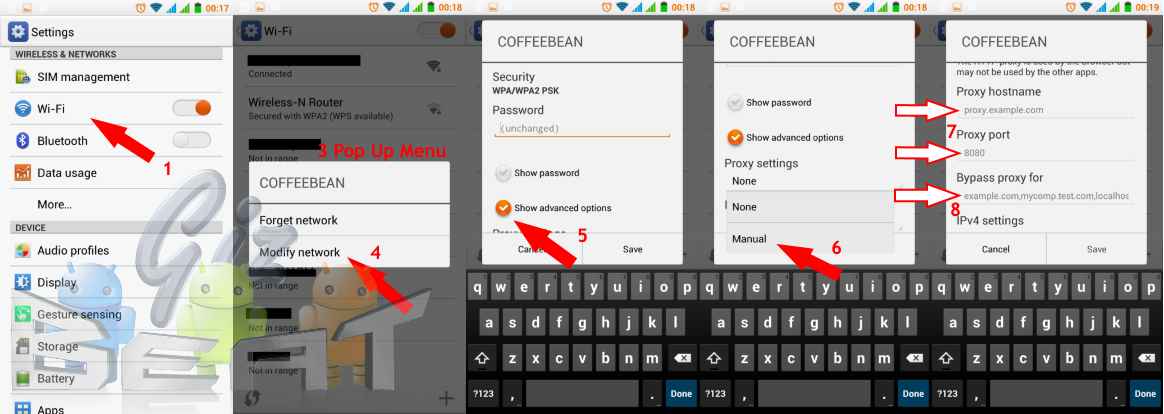
- Go into Settings and enable Wi-Fi.
- Go into the Wi-Fi menu and locate the network that requires a fixed proxy.
- Long press on the network’s name until a pop-up menu shows.
- Select Modify Network.
- Tick Show advanced options. This will show Proxy and IP configuration settings.
- Under Proxy Settings, tap on the field that says None to show the drop down menu. Select Manual.
- Scroll down to see the settings fields. Type in the appropriate hostname and port number.
- List bypass addresses if necessary.
- Tap Save.
How to Auto-Enable Proxy Settings for Networks
If you have a number of networks that you connect to that require proxy settings, you can download an app to make it easier. There are several available, one of which is ProxyDroid. This guide will show you how to create proxy profiles and bind them to specific networks. The app also allows your Android device to auto-detect and auto-enable proxy settings.
- Install ProxyDroid from here or search for it on Play Store.
- Tap on the pencil icon at the top of the screen to edit the current profile name. Type in your desired Proxy profile name and tap OK. You should now see the proxy name under Service Controller>Profiles.
- Under Proxy Settings, tap on Host. Enter the host name of your proxy service and tap OK. You should now see the host name you assigned to the profile under Host.
- Under Proxy Settings, tap on Port. Enter the port number of your proxy service and tap OK. You should see the port number update under Port field.
- In order to bind a WiFi network to the proxy profile created, tick Auto Connect.
- You will now be able to select the Bound Network item. Your WiFi list will come up. Tick the WiFi connections that use the proxy profile you created.
- If necessary, set the bypass addresses, and account information.
You can create multiple proxy profiles for various WiFi connections.
If you leave Auto Connect ticked, you do not need to open ProxyDroid and slide the switch to enable/disable the proxy settings everytime. As soon as your Android connects to the WiFi network bound to any of the proxy profiles you have, ProxyDroid will automatically enable the appropriate settings.


Leave a Reply