MTK6757 Helio P20 UMi Plus Extreme / UMi Plus E preview
UMi, one of the longest running China brands, has officially announced their phone– UMi Plus Extreme, also known as UMi Plus E. (more…)

UMi, one of the longest running China brands, has officially announced their phone– UMi Plus Extreme, also known as UMi Plus E. (more…)

GizBeat first broke the news regarding MTK6757 Helio P20 back in May, 2016. Now we’re seeing P20 trending because it’s about to hit the street in the UMi Plus Extreme Edition. (more…)

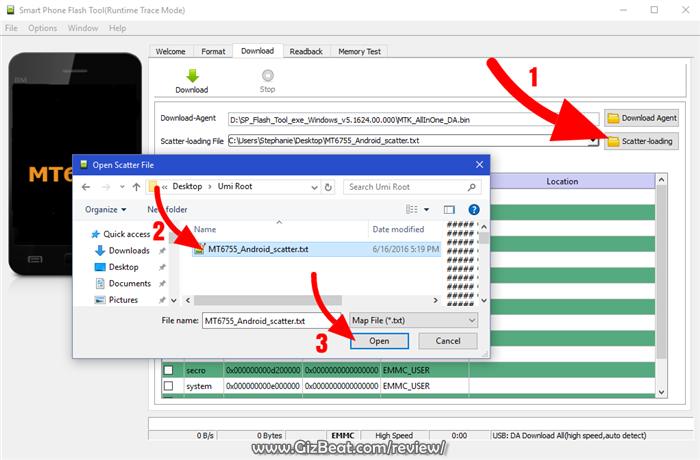
For those looking to root their UMi Super, the first step is to install TWRP custom recovery on the UMi Super. The process contains quite a few steps, but most of them take just a few seconds.
If it looks daunting, don’t worry, take each step one by one and you’ll come through with a rooted UMi Super within just a few minutes.
[spoiler style=”steelblue” collapse_link=”false” title=”KNOWLEDGE POINT about scatter files. Click here to read”]NOTE: A scatter file is what tells SP Flash Tool where to flash various parts of the firmware on your phone’s EMMC.
This scatter came from 2016-06-16 UMi Super ROM. If you’re on a different ROM, it’s extremely unlikely the recovery.img location will change, but there’s always a slim possibility of it.
If you’re at all in doubt, download the ROM that you’re currently on if you don’t already have it downloaded, and use the scatter from that.[/spoiler]
If you don’t already have MTK Preloader Drivers installed, we’ll go through that step now. NOTE: If you get an unsigned driver error and can’t continue with the driver install, then go to step #3. NOTE: Use #1 pack or #2 pack. Do not need to use both.
[spoiler style=”steelblue” collapse_link=”false” title=’If MTK MediaTek preloader vcom driver pack #1, click here’]
[spoiler style=”steelblue” collapse_link=”false” title=’If MTK MediaTek preloader vcom driver pack #2, click here’]
Do this step if:
and
[spoiler style=”steelblue” collapse_link=”false” title=’Click for disable driver signature enforcement guide’]
To install preloader drivers, some users of 64-Bit Windows may need to disable Driver Signature Verification / Enforcement. This quick procedure will have you up and modding your phone in no time.
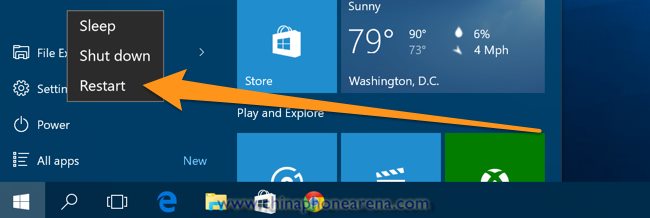


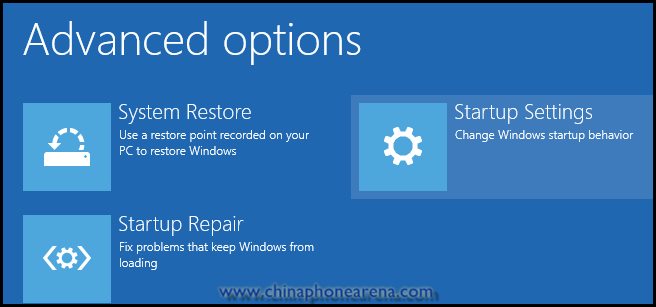
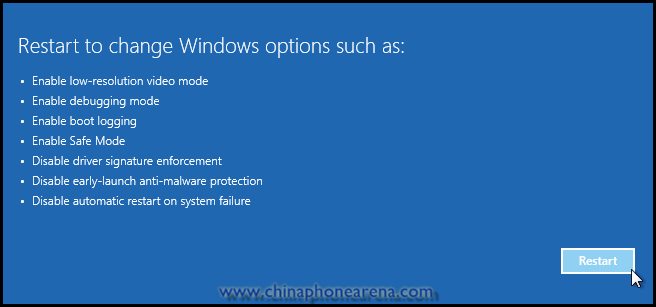

Your computer will now reboot into a mode which will allow you to install unsigned drivers, which is covered in the next steps.
Now go back to step #2 and install the MTK Preloader Drivers (GizBeat source)[/spoiler]
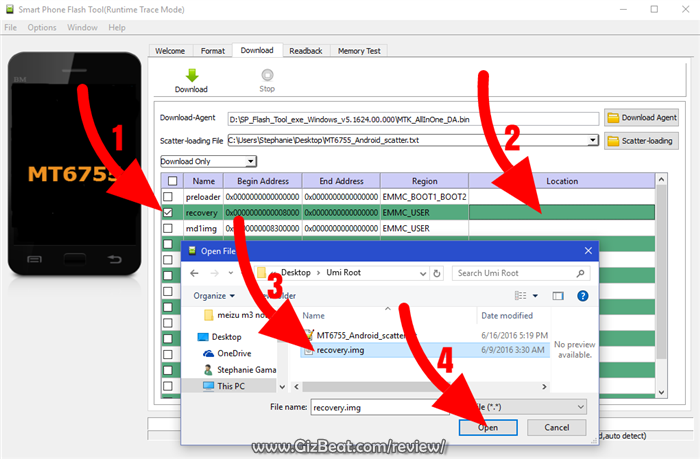
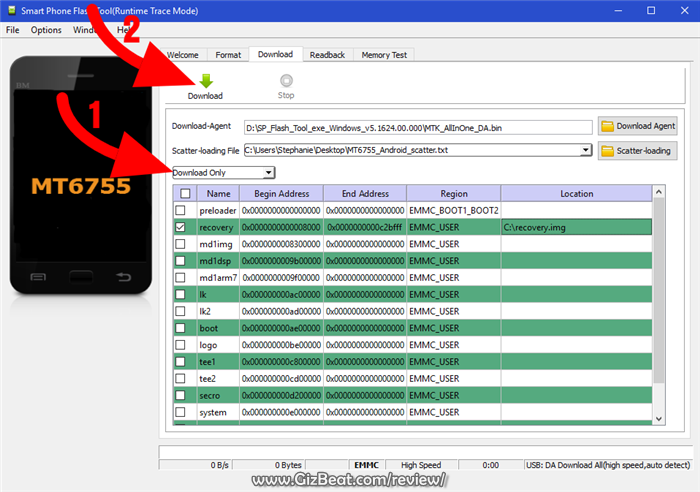
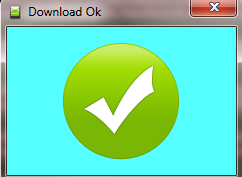
Done! Good job. You now have TWRP and a rooted UMi Super MT6755.
If you have any issues, comments, successes or failures, or just want to say thanks, please comment in the comment section and let us know.

Umi has long been synonymous with quality in the China phone world. They have been around about as long as Jiayu and THL, which makes them an elder brand.
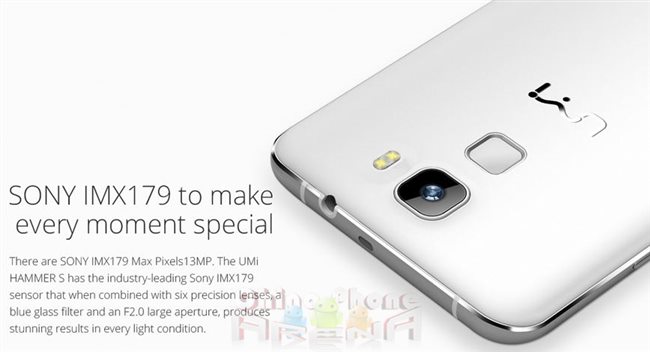
The Umi Hammer was one of their more popular models and they’ve now given the phone a reboot in the form of Umi Hammer S.
Umi Hammer S specifications
The Umi Hammer S carries the MT6735 SoC, this is the recently typical SoC manufacturers have been using to keep costs down for consumers and I’ve found it to be a very capable SoC, pushing Android without any issues.
We also see the largish battery coming in at 3200mAh. With the 720P display, this should provide very good battery life. Good enough to get nearly all users through the day. Moderate and light users should see a couple of days with a battery this size.
Umi is using the Type-C USB port which allows for faster data transfer with hardware capable computers. Type-C is backwards compatible with USB 1, 2 and 3, so there’s no need for worrying about being able to transfer and connect to older PCs.
Stylewise, the Umi Hammer S is sporting CNC process metal sides and a nice square design. The front glass is 2.5D arc style, which always adds a nice element of class to a mobile.
Also worthy of mention is the touch ID feature, which allows you to unlock your phone with a tap on the back. This is really where I prefer it on a mobile, as it’s much more comfortable and natural to scan your fingertip on the back as opposed to the center front.
A new feature recently come to several China mobiles is the universal infrared remote. This will allow you to control all of your compatible remote control gadgets with your Umi Hammer S.
I’ve recently reviewed a couple of Umi phones and have found them to be quality units, both in terms of use and physical build. If you’re looking for a 2GB RAM budget mobile with slick looks and are in an area with the aforementioned frequency support, consider the Umi Hammer S.

As mentioned in the preview, Umi has been around for quite awhile. Recently they’ve stepped up their game in regards to marketing towards Westerners and it should be interesting how the older tried and true Umi competes against the up & comers. (more…)

Well known as one of the top-quality budget brands, UMI, a long time player in the China smart phone market has now fully entered the battle on the Western front. They’ve always marketed towards Westerners, but recently have upped their game. (more…)

 Umi is one of the top names in China brands and many have been waiting for the Umi X3. Perhaps it’s a bit late in the game, or possibly it’s perfect timing. (more…)

 About a month back, we put a preview up of the Umi X3. Well now it’s ready to be sold and shops are starting to have it available for shipping. Unfortunately, some of the touted features we wrote about in the first preview are not to be. What it looks like is that there will be at least two different versions of the Umi X3. (more…)

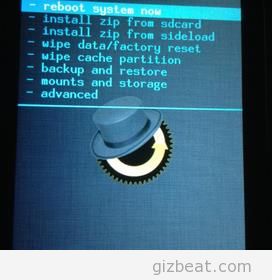 One of the most asked questions on the forum is ‘how to make custom recovery / CWM for MT6575, MT6515, MT6577, MT6517, MT6589, MT6582, MT6588, MT6592, *MT6572’ (*NOT For MT6572 with UBIFS type EMMC). (more…)

 We just recently made a post about the specs of LTE/4G Umi X3. It turns out the MTK6592 Umi X3 will be coming with 2GHz CPU as opposed to 1.7GHz. (more…)