How to boot into recovery from Android is something that will help you get into TWRP / CWM / custom recovery when holding volume up and power doesn’t work, or when holding volume down and power doesn’t work. (more…)
Blog
-

Amazing 8K New York City Time Lapse
This incredible 8k New York City time-lapse video, dubbed 8K Colors of New York, was made by Vimeo user Jansoli. It’s only a few minutes long, but obviously a monumental effort and a true labor of love. (more…)
-

$99 Elephone S7 review specs with Samsung Edge front glass
Elephone S7 edge glass
We’ve got to hand it to Elephone; they never fail to shock. The latest news is the announcement of MTK6737 MT6737 Elephone S7, which renders show as having a Samsung Galaxy style edge to the glass. Whether the final product will actually look like this is up in the air. (more…)
-

Dual camera LeTV Le X652 Le 2 preview specifications
Confirmation has just come in via TENAA, China’s equivalent to America’s FCC, that LeEco LeTV will be releasing their latest mobile series with a dual-camera setup. (more…)
-

Ulefone Metal TWRP download and root Ulefone Metal
Ulefone Metal TWRP download and Ulefone Metal root
This guide will help you install TWRP and root Ulefone Metal, the first step is to install TWRP custom recovery on the Ulefone Metal. The process contains quite a few steps, but most of them take just a few seconds. (more…)
-

iPhone 7 dual camera module manufacturer revealed
According to Economic Daily News, the Taiwanese camera module manufacturer will be developing at least some of the dual-camera modules in the yet unreleased iPhone 7. (more…)
-

Google AI compresses more efficiently than JPEG
Google researchers have developed a method using a neural network to compress image files more efficiently than current modern methods such as with JPEG.
AI TensorFlow
Researchers built an AI system using Google’s TensorFlow learning machine, then took 6 million random images from the net which had been compressed using modern day typical methods.
How it’s done
Each image was broken into 32×32 pixels and analyzed the 100 pieces with the least efficient compression methods. The idea here is that the AI could learn by looking at the most complex image areas, which makes compression of less complex sections much easier.
After this process was complete, the AI could then predict what an image would look like after compression and then generate an image.

In short, the AI is figuring out how to dynamically compress various parts of an image using varying methods and levels of compression.
According to Google researchers: “As far as we know, this is the first neural network architecture that is able to outperform JPEG at image compression across most bitrates on the rate-distortion curve on the Kodak dataset images, with and without the aid of entropy coding.”
Is it ready for us to use?
The project is still considered in alpha, thus has a long ways to go before it hits us, but it appears to be a step in the right direction towards saving precious memory card space.
-

DJI opens drone training academy in South Korea
The popular drone maker from China, DJI has officially opened a 1395 square meters/15016 square feet training arena in South Korea. The facility has an array of obstacle courses and education areas to help new flyers train. (more…)
-

Elephone fingerprint encrypted thumb drive
False hype or sincere?
Since the beginning, Elephone has been a huge hype machine, using questionable marketing practices to generate buzz about their brand. (more…)
-

Xiaomi Redmi Note 4 preview
Xiaomi Redmi Note 4 vs Xiaomi Redmi Pro. There was a bit of confusion recently with Xiaomi and their recently released Xiaomi Redmi Note 4 and Redmi Pro. Some thought that there wouldn’t actually be a “4” model; (more…)
-

5 picture samples from Xiaomi Redmi Note 4 camera
Recently released is the Xiaomi Redmi Note 4. It will go on sale starting this month and be shipping soon to Western countries. Check out the image samples from the Xiaomi Redmi Note 4. (more…)
-

Guide to Root Vernee Apollo Lite TWRP MT6797 Helio X20
For those looking to install TWRP and root their Vernee Apollo Lite, the first step is to install TWRP custom recovery on the Vernee Apollo Lite. The process contains quite a few steps, but most of them take just a few seconds.
If it looks daunting, don’t worry, take each step one by one and you’ll come through with a rooted Vernee Apollo Lite within just a few minutes.
1. Download
- MTK MediaTek auto preloader drivers #1 pack– These are the drivers that will allow the MTK SP Flash Tool to communicate with your mobile. Try these drivers first, as they may eliminate the need to disable Windows driver signing. If you have any issues then use the #2 pack.
- MTK MediaTek auto preloader drivers #2 pack – These are the drivers that will allow the MTK SP Flash Tool to communicate with your mobile
- Download latest SP Flash Tool – This is the tool that will be used to flash Vernee Apollo Lite with TWRP
- Vernee Apollo Lite root pack – This pack includes the Vernee Apollo Lite TWRP, SuperSU.zip, and Vernee Apollo Lite MTK6797 Helio X20 scatter file download.
[spoiler style=”steelblue” collapse_link=”false” title=”(click) What’s a scatter file?”]A scatter file is what tells SP Flash Tool exactly where to flash various parts of the firmware on your phone’s EMMC.[/spoiler]
2. Install MediaTek MT6797 Helio X20 preloader drivers
If you don’t already have MTK Preloader Drivers installed, we’ll go through that step now. NOTE: If you get an unsigned driver error and can’t continue with the driver install, then go to step #3. NOTE: Use #1 pack or #2 pack. Do not need to use both.
[spoiler style=”steelblue” collapse_link=”false” title=’If MTK MediaTek preloader vcom driver pack #1, click here’]
- Open the MTK adb vcom auto install driver pack #1 in WinRAR / unZip
- No need to extract, double click DriverInstall.exe or installdrv64.exe for x64 bit Windows
- Allow any permission requests
- At the end you should see something like this[/spoiler]
[spoiler style=”steelblue” collapse_link=”false” title=’If MTK MediaTek preloader vcom driver pack #2, click here’]
- Open the MTK MediaTek auto vcom driver install pack #2, and go to Win7_WinXP folder for 7 / XP, or Win8 folder for Windows 8 / Windows 10.
- No need to extract, double click DriverInstall.exe
- Allow any permission requests
- When you see “Windows can’t verify the publisher of this driver software”, click “Install this driver software anyway”
- At the end you should see something like this[/spoiler]
3. Turn off driver signature enforcement
Do this step if:
- You don’t already have MediaTek preloader drivers installed
and
- Getting error from Windows telling you drivers are unsigned and can’t be installed with pack #1 or pack #2
[spoiler style=”steelblue” collapse_link=”false” title=’Click for disable driver signature enforcement guide’]
To install preloader drivers, some users of 64-Bit Windows may need to disable Driver Signature Verification / Enforcement. This quick procedure will have you up and modding your phone in no time.
- Hold SHIFT while left-clicking restart. It’s the same for Windows 8.1 and Windows 10.
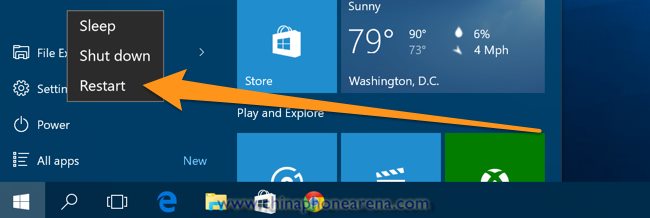
- Your computer will reboot and give you various options. Select “Troubleshoot”.

- Choose “Advanced options”.

- Choose “Startup settings”.
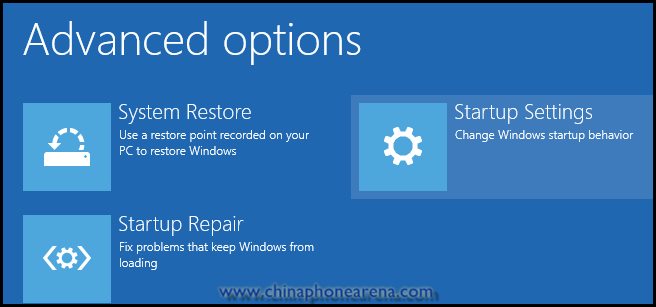
- Select “Restart”.
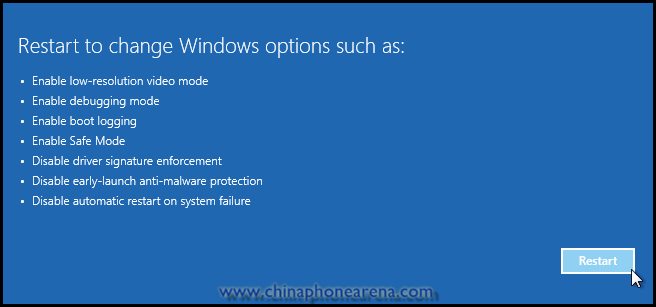
- Select “Disable driver signature enforcement”.

Your computer will now reboot into a mode which will allow you to install unsigned drivers, which is covered in the next steps.
Now go back to step #2 and install the MTK Preloader Drivers (GizBeat source)[/spoiler]
4. Install and run SP Flash Tool
- After downloading the latest SP Flash Tool, extract it to a directory where you’ll know where it’s at.
- Go to the extracted folder.
- Right-click ‘flash_tool.exe’ and ‘Run as administrator’
5. Load the Vernee Apollo Lite scatter
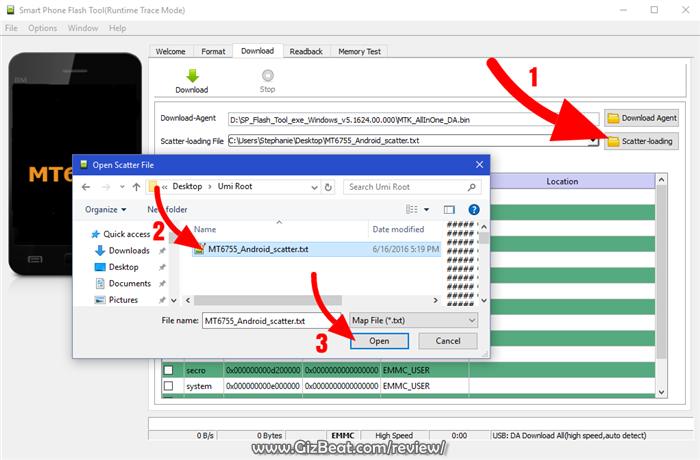
- If you haven’t already done so, extract the Vernee Apollo Lite TWRP and root pack to a folder where you’ll know where it’s at.
- Select ‘scatter-loading’ from upper-right of SP Flash Tools.
- Navigate to the folder that you extracted the Vernee Apollo Lite TWRP pack to
- Select ‘MT6797_Android_scatter.txt’ for MTK6797 Helio X20
- A checklist of different parts of the ROM should then show in the bottom portion of SP Flash Tools.
6. Select the Vernee Apollo Lite TWRP custom recovery
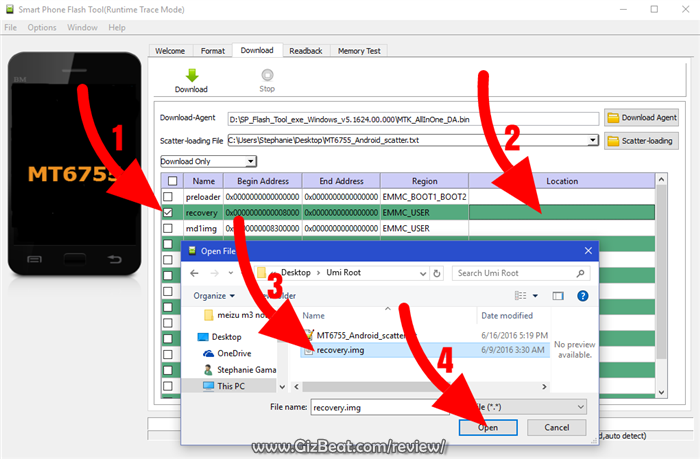
- If anything is selected besides ‘recovery.img’, deselect them all except ‘recovery.img’
- Double click the ‘recovery.img’ line in MTK SP Flash Tool (see video at 02:00)
- direct SP Flash Tool to the previously extracted Vernee Apollo Lite TWRP (‘recovery.img’ in the Vernee Apollo Lite TWRP pack)
7. Flash Vernee Apollo Lite TWRP
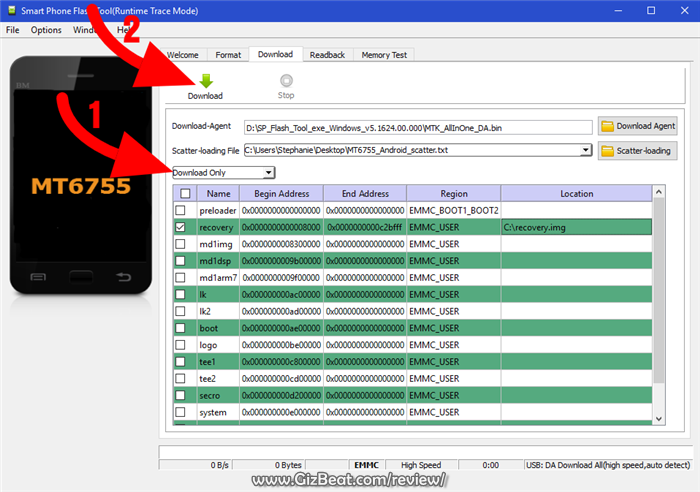
- Make sure the phone is disconnected from PC and that your phone is powered off.
- Make sure the box noted in the image above says ‘Download Only’
- Select ‘download’ from the top of SP Flash Tools.
- Connect USB cable to phone. Within a few seconds you should see a red bar come up. Wait a few more seconds and the flash should begin.
- It will all be over in just a few seconds, at which point you should see a dialog from SP Flash Tools telling you the flash is complete.

8. Boot into Vernee Apollo Lite TWRP recovery and root
- Disconnect your Vernee Apollo Lite from the PC.
- Hold VolumeUp+Power until you see the Vernee Apollo Lite logo show, then release Power, but continue holding VolumeUp until you see the Vernee Apollo Lite booted into TWRP.
- Flash / Install SuperSU.zip from the Vernee Apollo Lite Root pack.
Done! Good job. You now have TWRP and a rooted Vernee Apollo Lite MT6797 Helio X20.
If you have any issues, comments, successes or failures, or just want to say thanks, please comment in the comment section and let us know.


