Oukitel is one of our favorite brands at the moment. The K6000 Plus which we recently reviewed was found to have a true 6000mAh battery, build is very good, it supports Pump Express charging, has big RAM and ROM, and everything is working properly. (more…)
Author: Damian Parsons
-

Vkworld will release a Motorola RAZR clone
Nostalgia is heady stuff, and Vkworld is counting on it to trigger fond memories to power sales with their new mobile. The phone is a flip phone in the style of Motorola RAZR, which was a hugely popular phone series in the early 2000’s.
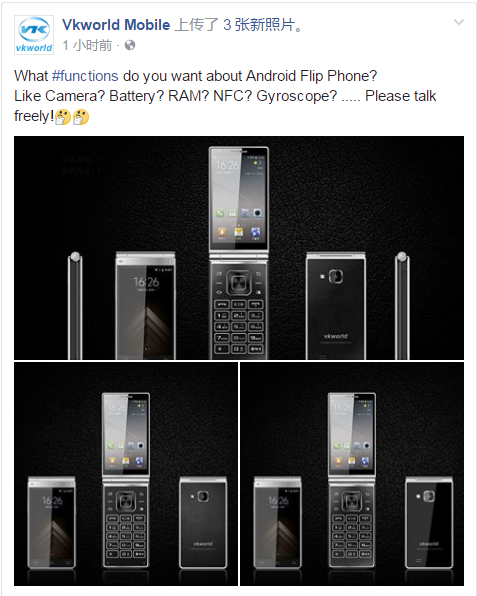
The Vkworld T2 Plus carries Android 7 Nougat, but beyond this, not much is known. There was a T2 last year with 4″@480P display, MT6580, 8GB ROM, and 1GB RAM. It’s just a guess, but the new Plus model is likely to carry MT6737, 2GB RAM, 16GB ROM, and perhaps a 720P display.
This isn’t the first time Vkworld has tried to tug on your emotion strings; they’ve also recently released a Nokia clone, even going so far as naming it Z3310, the same model number as Nokia used.
-

ZenFone 4 LTE band support and official spec review
Just officially announced today, Asus will be releasing six new ZenFone 4 phones. Historically, the ZenFone line has been a bit confusing, and this year is no different, so I’ve included a handy all-in-one table to allow an easy comparison between models.
This year has been the year of the dual-cam and Asus is jumping into the fray head first. All six models include a dual-camera setup, but depending on the model, quality of sensor and camera module used will differ, as will actual function of the models’ camera.
The ZenFone 4 models powered by Snapdragon 660, will allow users to take wide angle shots. Good for scenery and big group shots. This is similar to how the LG G6 works.
The ZenFone 4 models with Snapdragon 835 will give users the ability to take shots with a 2x optical zoom. Whether this is through digital trickery, or whether one module will have a different focal length, as with iPhone 7, is currently unclear.
Zenfone 4 Max and Zenfone 4 Max Pro main specs
- 5.5″@720P display
- 5000mAh battery
- Snapdragon 425 / 430
Zenfone 4 Selfie (ZD553KL) and Zenfone 4 Selfie Pro (ZD552KL)
- 5.5″@720P for (Selfie)
- 5.5″@1080P AMOLED (Selfie Pro)
- Snapdragon 430 (Selfie)
- Snapdragon 625 (Selfie Pro)
Zenfone 4 (ZE554KL) and Zenfone 4 Pro (ZS551KL)
- 5.5″@1080P Super IPS+ (4)
- 5.5″@1080P AMOLED (4 Pro)
- Snapdragon 660/630 (4)
- Snapdragon 835 (4 Pro)
The Zenfone 4 and Zenfone 4 Pro feature Sony IMX362 as the main camera. This sensor is 1/2.55″, which is quite large in the world of mobile phones; it gives us 1.4µm pixel size, which should give a step up for low-light shooting.
The Zenfone 4 lineup will carry different LTE band support based on purchase location, and it is confirmed that there will be N/C/S American band support on at least some of the models. Take a look at the table to see whether your area and bands will be covered.
Asus ZenFone 4
(ZE554KL)Asus ZenFone 4 Pro
(ZS551KL)Asus ZenFone 4 Selfie
(ZD553KL)Asus ZenFone 4 Selfie Pro
(ZD552KL)Asus ZenFone 4 Max
(ZC554KL ?)Asus ZenFone 4 Max Pro
(ZC554KL ?)Processor Qualcomm Snapdragon 660 / 630 Qualcomm Snapdragon 835 Qualcomm Snapdragon 430 Qualcomm Snapdragon 625 Qualcomm Snapdragon 425 or 430 Qualcomm Snapdragon 425 or 430 Camera Rear 12-megapixel Sony IMX362, 8-megapixel wide angle, front 8-megapixel Rear 12-megapixel Sony IMX362, 16-megapixel 2x zoom, front 8-megapixel Front 20-megapixel, 8-megapixel wide angle, rear 16-megapixel Front 24-megapixel, 5-megapixel wide angle, rear 16-megapixel Rear 13-megapixel, 5-megapixel wide angle, front 8-megapixel Rear 16-megapixel, 5-megapixel wide angle, front 16-megapixel Display 5.5-inch full-HD Super IPS+ (1,920×1,080 pixels) 5.5-inch full-HD AMOLED (1,920×1,020 pixels) 5.5-inch HD IPS (1,280×720 pixels) 5.5-inch full-HD AMOLED (1,920×1,020 pixels) 5.5-inch HD IPS (1,280×720 pixels) 5.5-inch HD IPS (1,280×720 pixels) Dual-SIM Yes Yes Yes Yes Yes Yes Memory Up to 6GB Up to 6GB 4GB 3GB or 4GB up to 4GB up to 3GB Storage Up to 64GB Up to 128GB 64GB 64GB Up to 64GB Up to 32GB Asus ZenFone 4
(ZE554KL)CN version
FDD-LTE (Bands 1, 2, 3, 5, 7, 8)
TD-LTE (Bands 34, 38, 39, 40, 41)
WCDMA (Bands 1, 2, 5, 8)
TD-SCDMA (Bands 34, 39)
CDMA (BC0)
EDGE/GPRS/GSM (850, 900, 1800, 1900MHz)
TW version
FDD-LTE (Bands 1, 2, 3, 5, 7, 8, 18, 19, 28)
TD-LTE (Band 38, 39, 40, 41)
WCDMA (Bands 1, 2, 3, 5, 6, 8, 19)
EDGE/GPRS/GSM (850, 900, 1800, 1900MHz)
WW/ID/IN version
FDD-LTE (Bands 1, 3, 5, 7, 8, 20)
TD-LTE (Band 40)
WCDMA (Bands 1, 5, 8)
EDGE/GPRS/GSM (850, 900, 1800, 1900MHz)
BR version
FDD-LTE (Bands 1, 2, 3, 4, 5, 7, 8, 12, 17, 28)
WCDMA (Bands 1, 2, 4, 5, 6, 8)
EDGE/GPRS/GSM (850, 900, 1800, 1900MHz)
NA/SA version
FDD-LTE (Bands 1, 2, 3, 4, 5, 7, 8, 12, 17, 28)
WCDMA (Bands 1, 2, 4, 5, 6, 8)
EDGE/GPRS/GSM (850, 900, 1800, 1900MHz)Asus ZenFone 4 Pro
(ZS551KL)TW/WW
DC-HSPA+: UL 5.76 / DL 42 Mbps
FDD-LTE (Bands 1, 2, 3, 4, 5, 7, 8, 17,19, 20, 28)
TD-LTE (Bands 38, 39, 40, 41 (2545~2655MHz))
WCDMA (Bands 1, 2, 3, 4, 5, 6, 8, 19)
EDGE/GPRS/GSM (850, 900, 1800, 1900MHz)
US/CA/BR/CO
FDD-LTE (Bands 1, 2, 3, 4, 5, 7, 8, 12, 17, 18, 19, 20, 26, 28, 29, 30)
TD-LTE (Bands 38, 39, 41)
WCDMA (Bands 1, 2, 3, 4, 5, 6, 8, 19)
EDGE/GPRS/GSM (850, 900, 1800, 1900MHz)
JP/IN
FDD-LTE (Bands 1, 2, 3, 4, 5, 7, 8, 12, 17, 18, 19, 20, 26, 28, 29, 30)
TD-LTE (Bands 38, 39, 40, 41)
WCDMA (Bands 1, 2, 3, 4, 5, 6, 8, 19)
EDGE/GPRS/GSM (850, 900, 1800, 1900MHz)Asus ZenFone 4 Selfie
(ZD553KL)TW/JP/HK/PH/BR version
WCDMA (Bands 1, 2, 5, 6, 8, 19)
GSM (Bands 2, 3, 5, 8)
TD-LTE (Bands 38, 41)
FDD-LTE (Bands 1, 3, 5, 7, 8, 18, 19, 26, 28)
WW / IN /ID version
TD-LTE (Band 40)
FDD-LTE (Bands 1, 3, 5, 7, 8, 20)
WCDMA (Bands 1, 5, 8)
GSM (Bands 2, 3, 5, 8)Asus ZenFone 4 Selfie Pro
(ZD552KL)WW version
FDD-LTE (Bands 1, 3, 5, 7, 8, 20)
TD-LTE (Band 40)
WCDMA (Bands 1, 5, 8)
GSM (850, 900, 1800, 1900 MHz)
TW/JP/HK version
FDD-LTE (Bands 1, 3, 5, 7, 8, 18, 19, 26, 28)
TD-LTE (Bands 38, 41)
WCDMA (Bands 1, 2, 5, 6, 8, 19)
GSM (850, 900, 1800, 1900 MHz)
US/BR version
FDD-LTE (Bands 1, 2, 3, 4, 5, 7, 8, 12, 17, 28)
WCDMA (Bands 1, 2, 4, 5, 6, 8)
GSM (850, 900, 1800, 1900 MHz)
CN version
FDD-LTE (Bands 1, 3, 5, 7, 8)
TD-LTE (Bands 34, 38, 39, 40, 41)
WCDMA (Bands 1, 2, 5, 8)
TD-SCDMA (Bands 34, 39)
CDMA EV-DO Rev. A (BC0)
GSM (850, 900, 1800, 1900 MHz)Asus ZenFone 4 Max
(ZC554KL ?)WW version
(IN/ID version)
FDD-LTE (Bands 1, 3, 5, 7, 8, 20)
TD-LTE (Band 40)
WCDMA (Bands 1, 5 8)
EDGE/GPRS/GSM (850, 900, 1800, 1900MHz)
TW version
(TW/JP/HK/SG/PH/
US/BR/CO/PE/CL)
FDD-LTE (Bands 1, 2, 3, 4, 5, 7, 8, 12, 17, 18, 19, 26, 28)
TD-LTE (Bands 38, 41)
WCDMA (Bands 1, 2, 4, 5, 6, 8, 19)
EDGE/GPRS/GSM (850, 900, 1800, 1900MHz)Asus ZenFone 4 Max Pro
(ZC554KL ?)WW version
(IN/ID version)
FDD-LTE (Bands 1, 3, 5, 7, 8, 20)
TD-LTE (Band 40)
WCDMA (Bands 1, 5 8)
EDGE/GPRS/GSM (850, 900, 1800, 1900MHz)
TW version
(TW/JP/HK/SG/PH/
US/BR/CO/PE/CL)
FDD-LTE (Bands 1, 2, 3, 4, 5, 7, 8, 12, 17, 18, 19, 26, 28)
TD-LTE (Bands 38, 41)
WCDMA (Bands 1, 2, 4, 5, 6, 8, 19)
EDGE/GPRS/GSM (850, 900, 1800, 1900MHz)The Zenfone 4 series is expected to be officially released September 2017. Retail prices are expected to run $399 for the Zenfone 4 and $599 for the Zenfone 4 Pro.
-

Xiaomi secures $1 billion loan to finance international expansion
From 18 banks across the world, Xiaomi has been granted a $1 billion loan (more…)
-

New TNT technology can reprogram cells to treat diseases, heal injuries, and even repair brain injuries
A device created at Ohio State University, can reprogram DNA in cells to transform themselves into other types of cells to treat disease and repair damage. (more…)
-

Helio X30 is going to be great. See how it stacks up against Qualcomm and Samsung
MediaTek has generally been considered a runner-up to Qualcomm; while power-wise the Helio X20/X25 MT6797 / MT6797T compete well with Snapdragon 820 and 821, efficiency-wise they are a couple of steps behind, as the MTK X20 / X25 use 20nm process, and Snap 820 / 821 use 14nm process. (more…)
-

Blackview BV8000 Pro tough phone unboxing first look
Unboxing a phone is always an exciting time; unboxing a unique phone is even more exciting. Check out our first look at the Blackview BV8000 Pro. (more…)
-

Western tech giants continue to cooperate with China, ensuring their own downfall
Washington looks on in fear, as China’s grip on the world tightens. (more…)
-

Ultimate Blackview BV8000 Pro root and Helio P20 root TWRP guide
For those looking to root their Blackview BV8000 Pro, the first step is to install TWRP custom recovery on the Blackview BV8000 Pro. The process contains quite a few steps, but most of them take just a few seconds.
If it looks daunting, don’t worry, take each step one by one and you’ll come through with a rooted Blackview BV8000 Pro within just a few minutes.
1. Download
- MTK MediaTek auto preloader drivers #1 pack– These are the drivers that will allow the MTK SP Flash Tool to communicate with your mobile. Try these drivers first, as they may eliminate the need to disable Windows driver signing. If you have any issues then use the #2 pack.
- MTK MediaTek auto preloader drivers #2 pack – These are the drivers that will allow the MTK SP Flash Tool to communicate with your mobile. You made need to disable Windows driver signing enforcement (see video).
- Download latest SP Flash Tool – This is the tool that will be used to flash Blackview BV8000 Pro with TWRP
- Blackview BV8000 Pro root pack – This pack includes the Blackview BV8000 Pro TWRP, Blackview BV8000 Pro stock recovery, Blackview BV8000 Pro stock boot, SuperSU.zip, and Blackview BV8000 Pro scatter file download (MT6757_Android_scatter.txt).
[spoiler style=”steelblue” collapse_link=”false” title=”KNOWLEDGE POINT about scatter files. Click here to read”]NOTE: A scatter file is what tells SP Flash Tool where to flash various parts of the firmware on your phone’s EMMC.[/spoiler]
2. Install MediaTek MT6757 Helio P20 preloader drivers
If you don’t already have MTK Preloader Drivers installed, we’ll go through that step now. NOTE: If you get an unsigned driver error and can’t continue with the driver install, then go to step #3. NOTE: Use #1 pack or #2 pack. Do not need to use both.
[spoiler style=”steelblue” collapse_link=”false” title=’If MTK MediaTek preloader vcom driver pack #1, click here’]
- Open the MTK adb vcom auto install driver pack #1 in WinRAR / unZip
- No need to extract, double click DriverInstall.exe or installdrv64.exe for x64 bit Windows
- Allow any permission requests
[spoiler style=”steelblue” collapse_link=”false” title=’If MTK MediaTek preloader vcom driver pack #2, click here’]
- Open the MTK MediaTek auto vcom driver install pack #2, and go to Win7_WinXP folder for 7 / XP, or Win8 folder for Windows 8 / Windows 10.
- No need to extract, double click DriverInstall.exe
- Allow any permission requests
- When you see “Windows can’t verify the publisher of this driver software”, click “Install this driver software anyway”
- At the end you shoold see something like this[/spoiler]
3. Turn off driver signature enforcement
Do this step if:
- You don’t already have MediaTek preloader drivers installed
and
- Getting error from Windows telling you drivers are unsigned and can’t be installed with pack #1 or pack #2
[spoiler style=”steelblue” collapse_link=”false” title=’Click for disable driver signature enforcement guide’]
To install preloader drivers, some users of 64-Bit Windows may need to disable Driver Signature Verification / Enforcement. This quick procedure will have you up and modding your phone in no time.
- Hold SHIFT while left-clicking restart. It’s the same for Windows 8.1 and Windows 10.
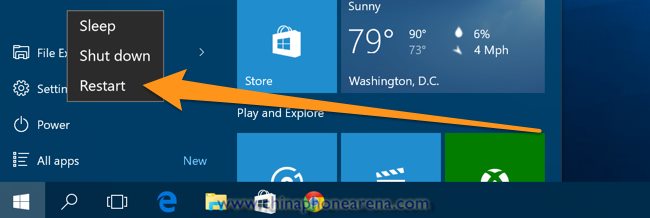
- Your computer will reboot and give you various options. Select “Troubleshoot”.

- Choose “Advanced options”.

- Choose “Startup settings”.
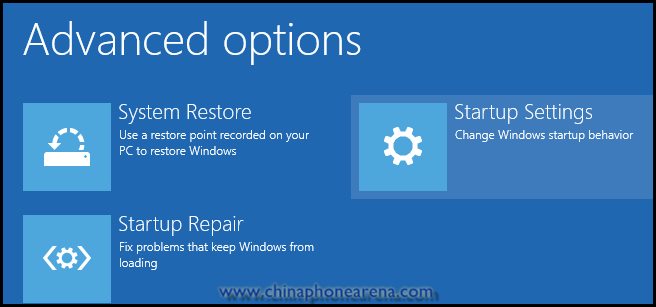
- Select “Restart”.
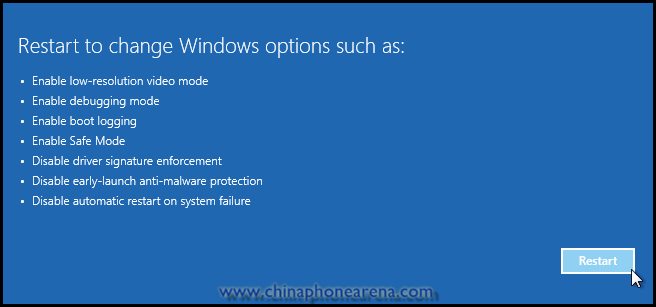
- Select “Disable driver signature enforcement”.

Your computer will now reboot into a mode which will allow you to install unsigned drivers, which is covered in the next steps.[/spoiler]
4. Install and run SP Flash Tool
- After downloading the latest SP Flash Tool, extract it to a directory where you’ll know where it’s at.
- Go to the extracted folder.
- Right-click ‘flash_tool.exe’ and ‘Run as administrator’
5. Copy SR1-SuperSU.zip from the root pack to the base of your phone, or to an SD card in your phone
6. Load the Blackview BV8000 Pro scatter
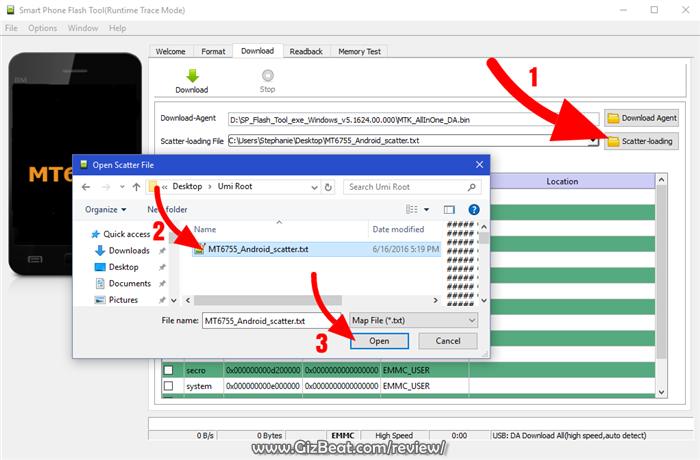
- If you haven’t already done so, extract the Blackview BV8000 Pro TWRP and root pack to a folder where you’ll know where it’s at.
- Select ‘scatter-loading’ from upper-right of SP Flash Tools.
- Navigate to the folder that you extracted the Blackview BV8000 Pro TWRP pack to
- Select ‘MT6757_Android_scatter.txt’
- A checklist of different parts of the ROM shoold then show in the bottom portion of SP Flash Tools.
7. Select the Blackview BV8000 Pro TWRP custom recovery
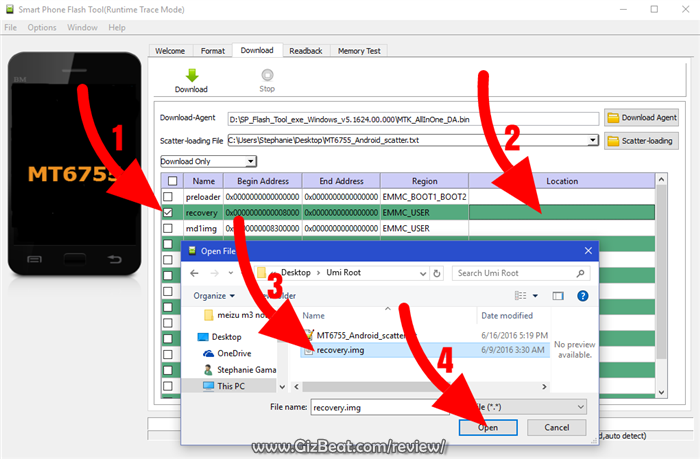
- If anything is selected besides ‘recovery.img’, deselect them all except ‘recovery.img’
- Double click the ‘recovery.img’ line in MTK SP Flash Tool (see video at 02:00)
- direct SP Flash Tool to the previously extracted Blackview BV8000 Pro TWRP (‘recovery.img’ in the Blackview BV8000 Pro TWRP pack)
8. Flash Blackview BV8000 Pro TWRP
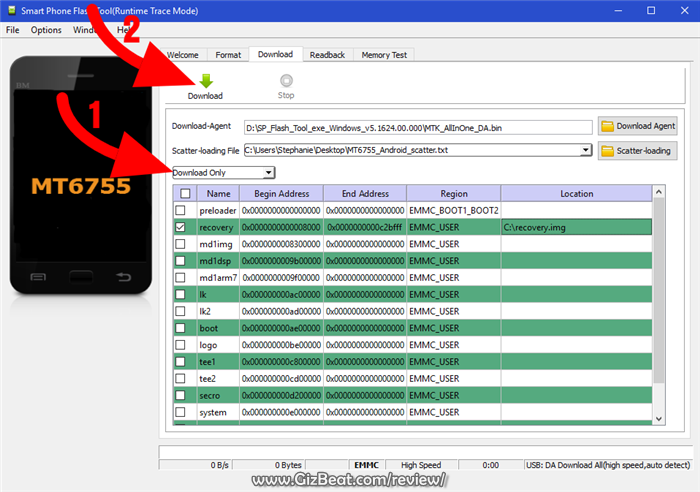
- NOTE: In the video above, I am flashing BOOT, not RECOVERY. The process is the same, but you will be flashing RECOVERY. Make sure to use “DOWNLOAD ONLY”, not “FIRMWARE UPGRADE” or “FORMAT+DOWNLOAD”
- Make sure the phone is disconnected from PC and that your phone is powered off.
- Make sure the box noted in the image above says ‘Download Only’
- Select ‘download’ from the top of SP Flash Tools.
- Connect USB cable to phone. Within a few seconds you shoold see a red bar come up. Wait a few more seconds and the flash shoold begin.
- It will all be over in just a few seconds, at which point you shoold see a dialog from SP Flash Tools telling you the flash is complete.

- If any errors, repeat the process but hold VolumeUp as you connect the phone and keep it held for several seconds after connecting.
9. Boot into Blackview BV8000 Pro TWRP recovery and root
- Disconnect your Blackview BV8000 Pro from the PC.
- Hold VolumeUp+Power until you see the Blackview BV8000 Pro logo show, then release Power, but continue holding VolumeUp until you see the Blackview BV8000 Pro booted into TWRP.
- Flash / Install SR1-SuperSU.zip that you previously copied to your phone.
Done! Good job. You now have TWRP and a rooted Blackview BV8000 Pro MT6757.
If you have any issues, comments, successes or failures, or just want to say thanks, please comment in the comment section and let us know.
-

Meizu Pro 7 Plus has dual AMOLED displays and dual Sony IMX368
Meizu, one of the longest running China brands, and know for putting out phones with quality hardware, is releasing a groundbreaking new phone– Meizu Pro 7 Plus. (more…)


