MT6757 Helio P20 has had leaked Geekbench 4 scores. According to the leaked image, the single core score sees a (more…)
Category: Helio P10 MT6755
-
HTC 10 Pro is a new Helio P10 MTK6755 mobile
Rewind two or three years and you’d find people shrugging off MTK MediaTek. We predicted MTK would begin to show up in mainstream brand mobiles. And so they did, with the likes of Sony and HTC using MediaTek MTK based SoC.

Helio P10 MT6755
The most recent mainstream MediaTek release is the HTC Pro 10. The HTC Pro 10 will carry MTK6755 Helio P10. The Helio P10 is our favorite mid-range SoC. As of August, there are no less than 50 models carrying the Helio P10.
HTC Pro 10 specs
- SoC: MT6755 Helio P10
- Display: 5.5″@1080P IPS OGS with Gorilla Glass protection
- TF SD expansion support: Yes
- RAM: 4GB
- ROM storage: 64GB
- Rear camera: 20mp, f2.2, 28mm, laser autofocus
- Front camera: 13mp, f2.2, 28mm
- Battery: 300mAh
Notably, the HTC Pro 10 carries a rear 20 MP, f/2.2, 28mm, laser autofocus, and a significant front camera as well at 13mp. Both rear and front have a fairly wide angle 28mm field of view.
We also see it has a huge 4GB RAM and huge 64GB RAM and is capable of expanding storage up to an additional 256GB.
How much is HTC 10 Pro?
The HTC 10 Pro has just officially gone on sale and is available for $240. This is significantly more than we see China brand Helio P10 mobiles selling for, but may be worth it to those who value owning a phone with mainstream branding and all that comes with it.
-

Mega screen 6″ Meizu M3 Max review specifications
While there was a big pause with 6″ mobiles in 2015, they’re now coming from a slew of manufacturers. (more…)
-

Blackview BV6000 TWRP and root MT6755 Helio P10 guide
For those looking to root their Blackview BV6000, the first step is to install TWRP custom recovery on the Blackview BV6000. The process contains quite a few steps, but most of them take just a few seconds.
If it looks daunting, don’t worry, take each step one by one and you’ll come through with a rooted Blackview BV6000 within just a few minutes.
1. Download
- MTK MediaTek auto preloader drivers #1 pack– These are the drivers that will allow the MTK SP Flash Tool to communicate with your mobile. Try these drivers first, as they may eliminate the need to disable Windows driver signing. If you have any issues then use the #2 pack.
- MTK MediaTek auto preloader drivers #2 pack – These are the drivers that will allow the MTK SP Flash Tool to communicate with your mobile
- Download latest SP Flash Tool – This is the tool that will be used to flash Blackview BV6000 with TWRP
- Blackview BV6000 root pack – This pack includes the Blackview BV6000 TWRP, Blackview BV6000 stock recovery, SuperSU.zip, and Blackview BV6000 scatter file download (20160608 MT6755_Android_scatter.txt).
[spoiler style=”steelblue” collapse_link=”false” title=”KNOWLEDGE POINT about scatter files. Click here to read”]NOTE: A scatter file is what tells SP Flash Tool where to flash various parts of the firmware on your phone’s EMMC.
This scatter came from 2016-06-16 Blackview BV6000 ROM. If you’re on a different ROM than 20160608, it’s extremely unlikely the recovery.img location will change, but there’s always a slim possibility of it.
If you’re at all in doubt, download the ROM that you’re currently on if you don’t already have it downloaded, and use the scatter from that.[/spoiler]
2. Install MediaTek MT6755 Helio P10 preloader drivers
If you don’t already have MTK Preloader Drivers installed, we’ll go through that step now. NOTE: If you get an unsigned driver error and can’t continue with the driver install, then go to step #3. NOTE: Use #1 pack or #2 pack. Do not need to use both.
[spoiler style=”steelblue” collapse_link=”false” title=’If MTK MediaTek preloader vcom driver pack #1, click here’]
- Open the MTK adb vcom auto install driver pack #1 in WinRAR / unZip
- No need to extract, double click DriverInstall.exe or installdrv64.exe for x64 bit Windows
- Allow any permission requests
- At the end you should see something like this[/spoiler]
[spoiler style=”steelblue” collapse_link=”false” title=’If MTK MediaTek preloader vcom driver pack #2, click here’]
- Open the MTK MediaTek auto vcom driver install pack #2, and go to Win7_WinXP folder for 7 / XP, or Win8 folder for Windows 8 / Windows 10.
- No need to extract, double click DriverInstall.exe
- Allow any permission requests
- When you see “Windows can’t verify the publisher of this driver software”, click “Install this driver software anyway”
- At the end you should see something like this[/spoiler]
3. Turn off driver signature enforcement
Do this step if:
- You don’t already have MediaTek preloader drivers installed
and
- Getting error from Windows telling you drivers are unsigned and can’t be installed with pack #1 or pack #2
[spoiler style=”steelblue” collapse_link=”false” title=’Click for disable driver signature enforcement guide’]
To install preloader drivers, some users of 64-Bit Windows may need to disable Driver Signature Verification / Enforcement. This quick procedure will have you up and modding your phone in no time.
- Hold SHIFT while left-clicking restart. It’s the same for Windows 8.1 and Windows 10.
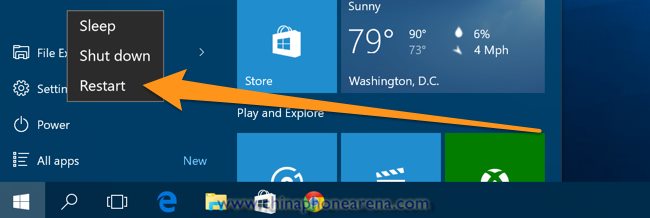
- Your computer will reboot and give you various options. Select “Troubleshoot”.

- Choose “Advanced options”.

- Choose “Startup settings”.
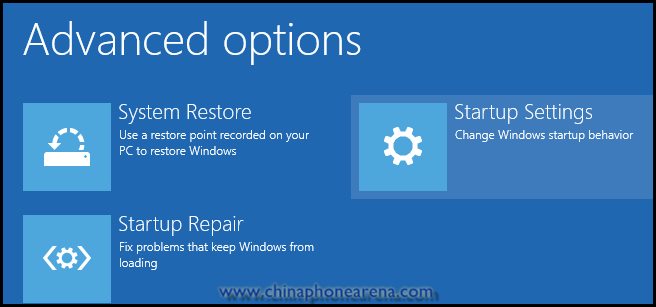
- Select “Restart”.
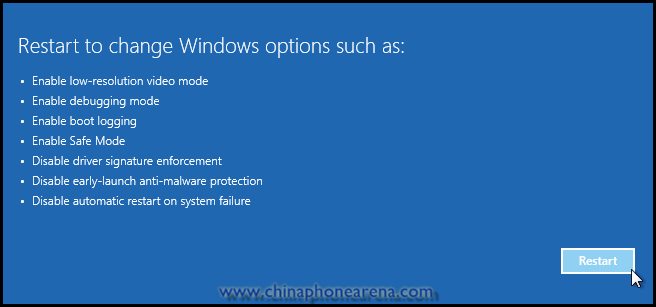
- Select “Disable driver signature enforcement”.

Your computer will now reboot into a mode which will allow you to install unsigned drivers, which is covered in the next steps.
Now go back to step #2 and install the MTK Preloader Drivers (GizBeat source)[/spoiler]
4. Install and run SP Flash Tool
- After downloading the latest SP Flash Tool, extract it to a directory where you’ll know where it’s at.
- Go to the extracted folder.
- Right-click ‘flash_tool.exe’ and ‘Run as administrator’
5. Load the Blackview BV6000 scatter
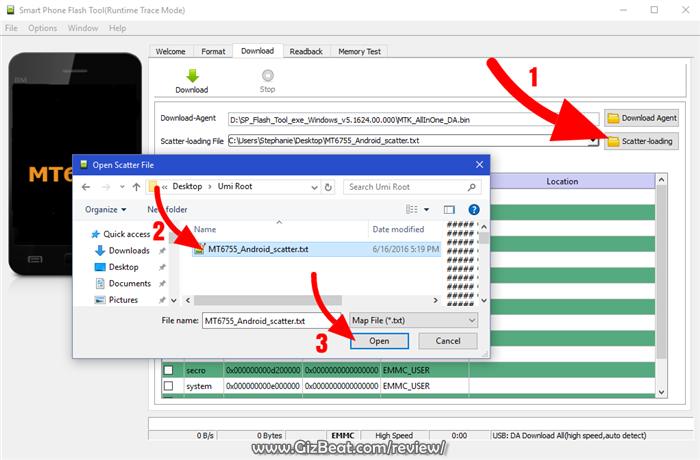
- If you haven’t already done so, extract the Blackview BV6000 TWRP and root pack to a folder where you’ll know where it’s at.
- Select ‘scatter-loading’ from upper-right of SP Flash Tools.
- Navigate to the folder that you extracted the Blackview BV6000 TWRP pack to
- Select ‘MT6755_Android_scatter.txt’
- A checklist of different parts of the ROM should then show in the bottom portion of SP Flash Tools.
6. Select the Blackview BV6000 TWRP custom recovery
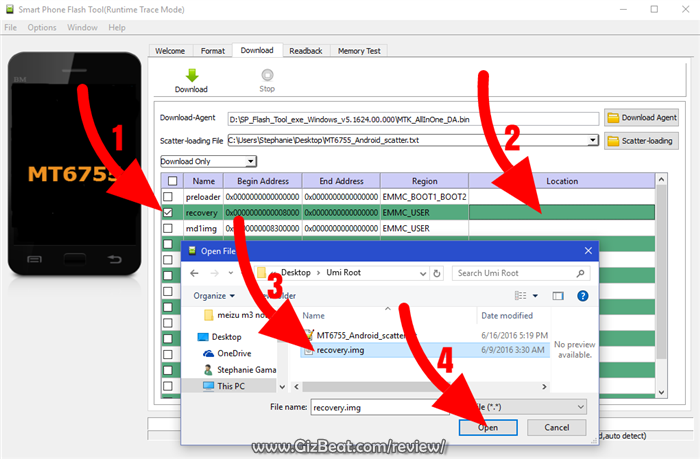
- If anything is selected besides ‘recovery.img’, deselect them all except ‘recovery.img’
- Double click the ‘recovery.img’ line in MTK SP Flash Tool (see video at 02:00)
- direct SP Flash Tool to the previously extracted Blackview BV6000 TWRP (‘recovery.img’ in the Blackview BV6000 TWRP pack)
7. Flash Blackview BV6000 TWRP
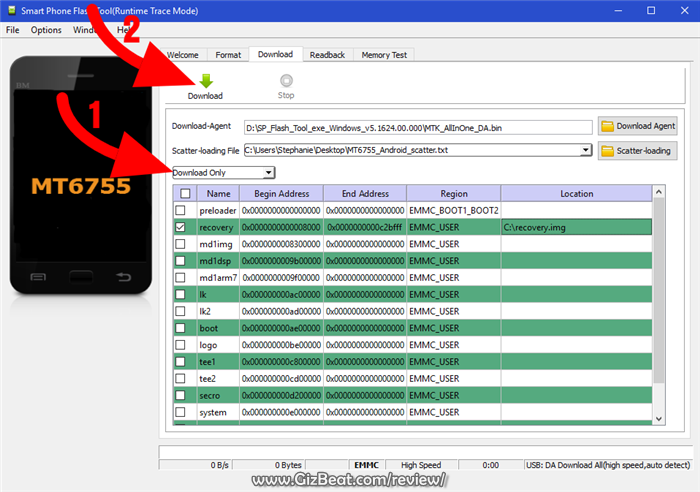
- Make sure the phone is disconnected from PC and that your phone is powered off.
- Make sure the box noted in the image above says ‘Download Only’
- Select ‘download’ from the top of SP Flash Tools.
- Connect USB cable to phone. Within a few seconds you should see a red bar come up. Wait a few more seconds and the flash should begin.
- It will all be over in just a few seconds, at which point you should see a dialog from SP Flash Tools telling you the flash is complete.

8. Boot into Blackview BV6000 TWRP recovery and root
- Disconnect your Blackview BV6000 from the PC.
- Hold VolumeUp+Power until you see the Blackview BV6000 logo show, then release Power, but continue holding VolumeUp until you see the Blackview BV6000 booted into TWRP.
- Flash / Install SuperSU.zip from the Blackview BV6000 Root pack.
Done! Good job. You now have TWRP and a rooted Blackview BV6000 MT6755.
If you have any issues, comments, successes or failures, or just want to say thanks, please comment in the comment section and let us know.
-

UMi Super TWRP and root UMi Super MT6755 Helio P10
For those looking to root their UMi Super, the first step is to install TWRP custom recovery on the UMi Super. The process contains quite a few steps, but most of them take just a few seconds.
If it looks daunting, don’t worry, take each step one by one and you’ll come through with a rooted UMi Super within just a few minutes.
1. Download
- MTK MediaTek auto preloader drivers #1 pack– These are the drivers that will allow the MTK SP Flash Tool to communicate with your mobile. Try these drivers first, as they may eliminate the need to disable Windows driver signing. If you have any issues then use the #2 pack.
- MTK MediaTek auto preloader drivers #2 pack – These are the drivers that will allow the MTK SP Flash Tool to communicate with your mobile
- Download latest SP Flash Tool – This is the tool that will be used to flash UMi Super with TWRP
- UMi Super root pack – This pack includes the UMi Super TWRP, SuperSU.zip, and UMi Super scatter file download (MT6755_Android_scatter.txt).
[spoiler style=”steelblue” collapse_link=”false” title=”KNOWLEDGE POINT about scatter files. Click here to read”]NOTE: A scatter file is what tells SP Flash Tool where to flash various parts of the firmware on your phone’s EMMC.
This scatter came from 2016-06-16 UMi Super ROM. If you’re on a different ROM, it’s extremely unlikely the recovery.img location will change, but there’s always a slim possibility of it.
If you’re at all in doubt, download the ROM that you’re currently on if you don’t already have it downloaded, and use the scatter from that.[/spoiler]
2. Install MediaTek MT6755 Helio P10 preloader drivers
If you don’t already have MTK Preloader Drivers installed, we’ll go through that step now. NOTE: If you get an unsigned driver error and can’t continue with the driver install, then go to step #3. NOTE: Use #1 pack or #2 pack. Do not need to use both.
[spoiler style=”steelblue” collapse_link=”false” title=’If MTK MediaTek preloader vcom driver pack #1, click here’]
- Open the MTK adb vcom auto install driver pack #1 in WinRAR / unZip
- No need to extract, double click DriverInstall.exe or installdrv64.exe for x64 bit Windows
- Allow any permission requests
- At the end you should see something like this[/spoiler]
[spoiler style=”steelblue” collapse_link=”false” title=’If MTK MediaTek preloader vcom driver pack #2, click here’]
- Open the MTK MediaTek auto vcom driver install pack #2, and go to Win7_WinXP folder for 7 / XP, or Win8 folder for Windows 8 / Windows 10.
- No need to extract, double click DriverInstall.exe
- Allow any permission requests
- When you see “Windows can’t verify the publisher of this driver software”, click “Install this driver software anyway”
- At the end you should see something like this[/spoiler]
3. Turn off driver signature enforcement
Do this step if:
- You don’t already have MediaTek preloader drivers installed
and
- Getting error from Windows telling you drivers are unsigned and can’t be installed with pack #1 or pack #2
[spoiler style=”steelblue” collapse_link=”false” title=’Click for disable driver signature enforcement guide’]
To install preloader drivers, some users of 64-Bit Windows may need to disable Driver Signature Verification / Enforcement. This quick procedure will have you up and modding your phone in no time.
- Hold SHIFT while left-clicking restart. It’s the same for Windows 8.1 and Windows 10.

- Your computer will reboot and give you various options. Select “Troubleshoot”.

- Choose “Advanced options”.

- Choose “Startup settings”.

- Select “Restart”.

- Select “Disable driver signature enforcement”.

Your computer will now reboot into a mode which will allow you to install unsigned drivers, which is covered in the next steps.
Now go back to step #2 and install the MTK Preloader Drivers (GizBeat source)[/spoiler]
4. Install and run SP Flash Tool
- After downloading the latest SP Flash Tool, extract it to a directory where you’ll know where it’s at.
- Go to the extracted folder.
- Right-click ‘flash_tool.exe’ and ‘Run as administrator’
5. Load the UMi Super scatter

- If you haven’t already done so, extract the UMi Super TWRP and root pack to a folder where you’ll know where it’s at.
- Select ‘scatter-loading’ from upper-right of SP Flash Tools.
- Navigate to the folder that you extracted the UMi Super TWRP pack to
- Select ‘MT6755_Android_scatter.txt’
- A checklist of different parts of the ROM should then show in the bottom portion of SP Flash Tools.
6. Select the UMi Super TWRP custom recovery

- If anything is selected besides ‘recovery.img’, deselect them all except ‘recovery.img’
- Double click the ‘recovery.img’ line in MTK SP Flash Tool (see video at 02:00)
- direct SP Flash Tool to the previously extracted UMi Super TWRP (‘recovery.img’ in the UMi Super TWRP pack)
7. Flash UMi Super TWRP

- Make sure the phone is disconnected from PC and that your phone is powered off.
- Make sure the box noted in the image above says ‘Download Only’
- Select ‘download’ from the top of SP Flash Tools.
- Connect USB cable to phone. Within a few seconds you should see a red bar come up. Wait a few more seconds and the flash should begin.
- It will all be over in just a few seconds, at which point you should see a dialog from SP Flash Tools telling you the flash is complete.

8. Boot into UMi Super TWRP recovery and root
- Disconnect your UMi Super from the PC.
- Hold VolumeUp+Power until you see the UMi Super logo show, then release Power, but continue holding VolumeUp until you see the UMi Super booted into TWRP.
- Flash / Install SuperSU.zip from the UMi Super Root pack.
Done! Good job. You now have TWRP and a rooted UMi Super MT6755.
If you have any issues, comments, successes or failures, or just want to say thanks, please comment in the comment section and let us know.
-

Change official Meizu M3 Note China ROM to Global International firmware corrupt
If you’re trying to root MT6755 Helio P10 Meizu M3 Note and/or change your MT6755 MTK6755 Helio P10 Meizu M3 Note to the International / Global 5.1.3.3G 5.1.3.2G 5.1.3.1G 5.1.3.0G Meizu M3 Note ROM from 5.8.99.0G or from Chinese ROM 5.1.3.1A / 5.1.3.2A / 5.1.3.3A / 5.1.3.4A and you’re getting a “firmware corrupt” notification in recovery, you’ve come to the right guide. (more…)
-

3 new SoC from MTK Helio P10 vs Helio P20 vs Helio P30 upcoming MediaTek SoC comparison
MT6757 Helio P20 is set to take.the stage. After the very successful MT6755 Helio P10 has been implemented in a slew of China mobiles, the new Helio P20 takes things to another level with higher CPU and GPU clock speeds. We still expect MT6755 Helio P10 to be used in many upcoming mobiles, and the MTK6755 Helio P20 to begin showing up in slightly higher tier MediaTek devices.
The specs in the table for P10 P20 are official, while the specs in the Helio P30 and Helio P30T column are based on leaked insider information.
Helio P10 vs Helio P20 vs Helio P30 specifications
Component MediaTek Helio P25 MTK6757T MediaTek Helio P10
MT6755
MTK6755MediaTek Helio P20 MTK6757 Helio P30/P30T (See CPU/GPU clock) Process 16nm 28nm 16nm 16nm CPU max 64-bit 8-core
[email protected]64-bit 8-core
[email protected]64-bit 8-core
[email protected]big.LITTLE 4-core 64-bit [email protected]/2.2GHz (Helio P30T) + 4-core [email protected] GPU max Mali-T880 MP2@900MHz Mali-T860 MP2@700MHz Mali-T880 MP2@900MHz ARM Mimir MP2@780/850MHz (Helio P30T) Display support max FHD 1920×1080 60fps 2x DSI for dual display FHD 1920×1080 60fps FHD 1920×1080 60fps 2x DSI for dual display FHD 1920×1080 Video decode max 4Kx2K 30fps H.264/265 1080p 30fps H.264/265 4Kx2K 30fps H.264/265 4Kx2K 30fps H.264/265 Video encode max 4Kx2K 30fps H.264 1080p 30fps H.264 4Kx2K 30fps H.264 4Kx2K 30fps H.264 Modem LTE FDD TDD R.11 Cat.6 with 2×20 CA. C2K SRLTE. L+W DSDS support, DC-HSPA+, TD-S CDMA, EDGE CDMA2000 1x/
EVDO Rev. A (3.1/1.8Mbps, SRLTE) LTE/GPS Co-clock SupportedLTE FDD/TDD R11 Cat-6
with 2×20 CA (300/ 50Mbps), DC-HSPA+, TD-SCDMA, EDGE CDMA2000 1x/
EVDO Rev. A (3.1/1.8Mbps, SRLTE) LTE/GPS Co-clock SupportedLTE FDD TDD R.11 Cat.6 with 2×20 CA. C2K SRLTE. L+W DSDS support, DC-HSPA+, TD-S CDMA, EDGE CDMA2000 1x/
EVDO Rev. A (3.1/1.8Mbps, SRLTE) LTE/GPS Co-clock SupportedCat.7 (up 100Mbps, down 300Mbps) WiFi AC/ABGN up to 90Mbps ABGN up to 90Mbps AC/ABGN up to 90Mbps AC/ABGN up to 90Mbps RAM max Up to 2 x LPDDR4X 1600MHz (up to 6GB) + 1x LPDDR3 933Mhz (up to 4GB) eMMC 5.1 LPDDR3 933MHz
4GB eMMC 5.1Up to 2 x LPDDR4X 1600MHz (up to 6GB) + 1x LPDDR3 933Mhz (up to 4GB) eMMC 5.1 Up to 2 x LPDDR4X 1600MHz (up to 6GB) + 1x LPDDR3 933Mhz (up to 4GB) eMMC UFS2.0 5.1 Camera max 13MP+13MP dual rear, or 24MP@24fps
16MP@30fps
ZSD Dual ISP
Improved 3A/denoise/demosaic/sharpness
Bayer & Mono sensor support21MP@24fps
16MP@30fps
ZSD Dual ISP
Improved 3A/denoise/demosaic/sharpness24MP@24fps
16MP@30fps
ZSD Dual ISP
Improved 3A/denoise/demosaic/sharpness
Bayer & Mono sensor supportP10 vs P20
There is a big jump from Helio P10 vs Helio P20 with the P20 allowing decoding and encoding up to 4kx2k, as well as support for dual-displays.
P10 vs P20 we see the GPU is a nice bump up from Mali-T860 MP2 to Mali-T880 MP2.
P10/20 vs P30
Comparing Helio P10 and P20 vs Helio P30 rumored specs, we see the P30 carries a big.LITTLE configuration with 4-core Cortex-A72. We also see the P30 will have ARM’s new Mimir GPU. Mimir is the codename for ARM’s latest GPU technology.
Note there is also a Helio P30T. Helio P30 vs P30T gives us 780MHz vs 850MHz respectively for the GPU and 2.0GHz vs 2.2GHz respectively for the Cortex-A72 cores.
-

Sony Xperia X and Sony Xperia XA F3216 Helio P10 MTK6755 preview
MediaTek has picked up some huge steam with Sony incorporating an MTK SoC in the soon to be released Sony Xperia XA aka Sony F3216 .
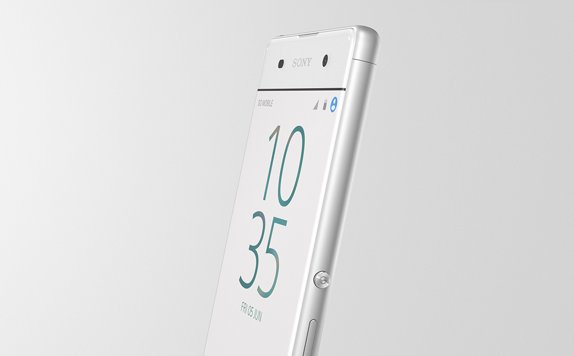
Along with the Sony Xperia XA, will be the Sony Xperia X. Both of these phones carry some interesting features including a dedicated physical button tied to the camera app, and hybrid phase detection autofocus.
Sony Xperia XA Sony Xperia X SoC MT6755 / MTK6755
(Helio P10)Snapdragon 650
(MSM 8956)CPU big.LITTLE 4x ARM® Cortex™ [email protected] + 4x ARM® Cortex™ [email protected] big.LITTLE 2x ARM® Cortex™ A72 + 4x ARM® Cortex™ A53 GPU ARM® Mali-T860 Adreno™ 510 GPU Display IPS OGS 5.0″@720P IPS OGS 5.0″@1080P Rear Camera 1/3″ 13MP Exmor™ RS
Hybrid autofocus (Phase detection + Contrast)1/2.3″ 23MP Exmor™ RS
Predictive Hybrid autofocus (Phase detection + Contrast)Front Camera 8MP Exmor R 1/3″ 13MP Exmor™ RS RAM 2GB ROM storage 16GB (11GB free for user) 32GB / 64GB OS Android 6.0 Marshmallow Android 6.0 Marshmallow Battery 2300mAh 2620mAh TF SD expansion Yes, up to 200GB Yes, up to 200GB Frequency support Location dependant Location dependant Fingerprint sensor No Yes NFC No Yes Stereo audio recording Yes Yes Quick Charge Yes Yes Colors Black / White / Lime / Rose Black / White / Lime / Rose Dimensions 143.6 x 66.8 x 7.9mm 143 x 69 x 7.7mm Weight 137.4g 152g Sony Xperia X
We see that the X is the higher specced model of the two. It carries a bigger battery, 1080P FHD display and Snapdragon 650 SoC.
The Xperia X also has a superior camera at 23MP and with a 2/3″ sensor. This size sensor is the same size we normally see in standalone consumer compacts and super zooms.

The front camera on the Sony Xperia X is surprisingly high-specced as well– 13MP Exymor RS. This is likely Sony IMX214, but may be Sony IMX258. In either case, it’s an incredible leap for front cameras and means that in good light you will be able to take respectable, sharp images.
Sony Xperia XA / F3216
The lower specced model, Xperia XA, will bring along with it the MTK6755 Helio P10. This SoC is no slouch and it’s excellent to see Sony giving MTK a bit of clout by using it in the upcoming Sony Xperia XA.

Sony Xperia X release date – When is the Sony Xperia X coming out?
The official release date in the UK for Sony Xperia X is 20th of May for the Sony Xperia X, and 10th of June for the Sony Xperia XA.
Order Sony Xperia X – How much is Sony Xperia X and XA F3216 ?
As of the posting date of this article, the Sony Xperia X preorder at Amazon UK is running £499.99 and the Sony Xperia XA is running £239.99.
Preorder Sony Xperia X Preorder Sony Xperia XA -

Meizu M3 Note preview MT6755 Helio P10
Meizu is considered one of the top China brands. We reviewed their Meizu M2 Mini and found it to be a great little bargain mobile. (more…)
-

MediaTek Imagiq dual-camera ISP system here now
It’s not just Huawei, LG and Apple getting in on the dual-camera parade; MediaTek has joined the battle with their new Imagiq image signal processor (ISP).

To be featured on the just officially announced MTK6797 Helio X20, and the already released Helio P20, Imagiq ISP is a hardware-based solution built from the ground up to work with dual-camera systems on mobile devices. (more…)
-

4GB 32GB Elephone P9000 vs Elephone P9000 Lite whats the difference between P9000 and P9000 lite
No rest for the wicked, Elephone is still at it releasing a model a minute. Their latest venture jumps into the $250-300 range with the P9000. (more…)


