Category: Recent

  • UMi Super TWRP and root UMi Super MT6755 Helio P10

    UMi Super TWRP and root UMi Super MT6755 Helio P10

    For those looking to root their UMi Super, the first step is to install TWRP custom recovery on the UMi Super. The process contains quite a few steps, but most of them take just a few seconds.

    If it looks daunting, don’t worry, take each step one by one and you’ll come through with a rooted UMi Super within just a few minutes.

    1. Download

    [spoiler style=”steelblue” collapse_link=”false” title=”KNOWLEDGE POINT about scatter files. Click here to read”]NOTE: A scatter file is what tells SP Flash Tool where to flash various parts of the firmware on your phone’s EMMC.

    This scatter came from 2016-06-16 UMi Super ROM. If you’re on a different ROM, it’s extremely unlikely the recovery.img location will change, but there’s always a slim possibility of it.

    If you’re at all in doubt, download the ROM that you’re currently on if you don’t already have it downloaded, and use the scatter from that.[/spoiler]

    2. Install MediaTek MT6755 Helio P10 preloader drivers

    If you don’t already have MTK Preloader Drivers installed, we’ll go through that step now. NOTE: If you get an unsigned driver error and can’t continue with the driver install, then go to step #3. NOTE: Use #1 pack or #2 pack. Do not need to use both.

    [spoiler style=”steelblue” collapse_link=”false” title=’If MTK MediaTek preloader vcom driver pack #1, click here’]

    • Open the MTK adb vcom auto install driver pack #1 in WinRAR / unZip
    • No need to extract, double click DriverInstall.exe or installdrv64.exe for x64 bit Windows
    • Allow any permission requests
    • At the end you should see something like this[/spoiler]

    [spoiler style=”steelblue” collapse_link=”false” title=’If MTK MediaTek preloader vcom driver pack #2, click here’]

    • Open the MTK MediaTek auto vcom driver install pack #2, and go to Win7_WinXP folder for 7 / XP, or Win8 folder for Windows 8 / Windows 10.
    • No need to extract, double click DriverInstall.exe
    • Allow any permission requests
    • When you see “Windows can’t verify the publisher of this driver software”, click “Install this driver software anyway”
    • At the end you should see something like this[/spoiler]

    3. Turn off driver signature enforcement

    Do this step if:

    • You don’t already have MediaTek preloader drivers installed

    and

    • Getting error from Windows telling you drivers are unsigned and can’t be installed with pack #1 or pack #2

    [spoiler style=”steelblue” collapse_link=”false” title=’Click for disable driver signature enforcement guide’]

    To install preloader drivers, some users of 64-Bit Windows may need to disable Driver Signature Verification / Enforcement. This quick procedure will have you up and modding your phone in no time.

    1. Hold SHIFT while left-clicking restart. It’s the same for Windows 8.1 and Windows 10.
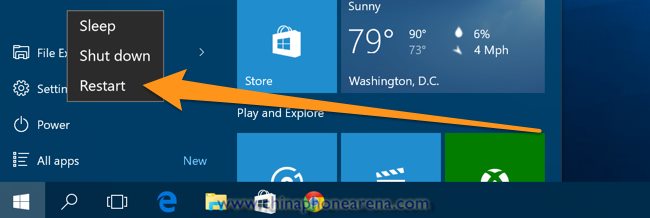
      disable-driver-enforcement-1
    2. Your computer will reboot and give you various options. Select “Troubleshoot”.
      disable-driver-enforcement-2
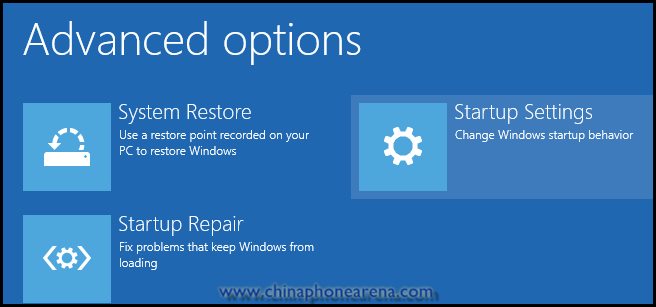
    3. Choose “Advanced options”.
      disable-driver-enforcement-7
    4. Choose “Startup settings”.
      disable-driver-enforcement-3
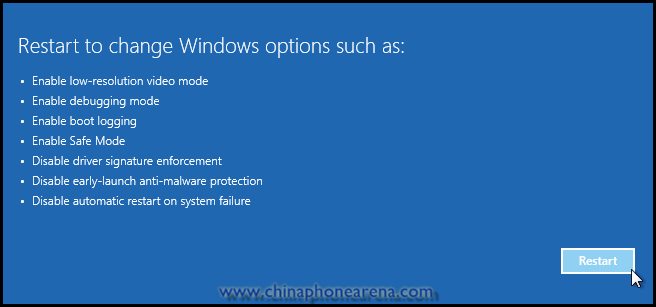
    5. Select “Restart”.
    6. Select “Disable driver signature enforcement”.
      disable-driver-enforcement-6

    Your computer will now reboot into a mode which will allow you to install unsigned drivers, which is covered in the next steps.

    Now go back to step #2 and install the MTK Preloader Drivers (GizBeat source)[/spoiler]

    4. Install and run SP Flash Tool

    • After downloading the latest SP Flash Tool, extract it to a directory where you’ll know where it’s at.
    • Go to the extracted folder.
    • Right-click ‘flash_tool.exe’ and ‘Run as administrator’

    5. Load the UMi Super scatter
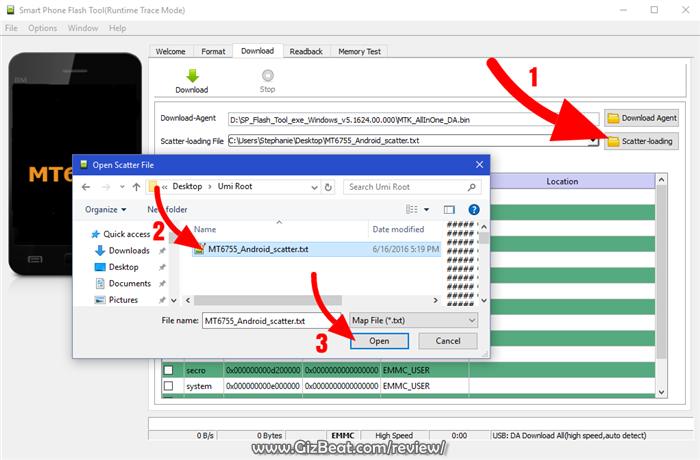
    umi-super-root-umi-super-twrp-5

    • If you haven’t already done so, extract the UMi Super TWRP and root pack to a folder where you’ll know where it’s at.
    • Select ‘scatter-loading’ from upper-right of SP Flash Tools.
    • Navigate to the folder that you extracted the UMi Super TWRP pack to
    • Select ‘MT6755_Android_scatter.txt’
    • A checklist of different parts of the ROM should then show in the bottom portion of SP Flash Tools.

    6. Select the UMi Super TWRP custom recovery
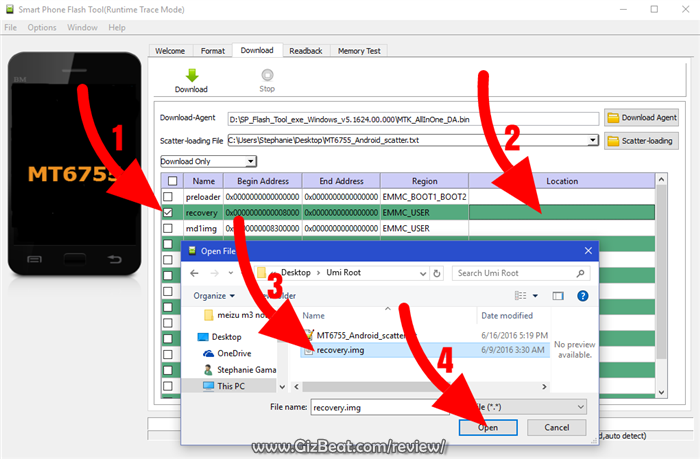
    umi-super-root-umi-super-twrp-6

    • If anything is selected besides ‘recovery.img’, deselect them all except ‘recovery.img’
    • Double click the ‘recovery.img’ line in MTK SP Flash Tool (see video at 02:00)
    • direct SP Flash Tool to the previously extracted UMi Super TWRP (‘recovery.img’ in the UMi Super TWRP pack)

    7. Flash UMi Super TWRP
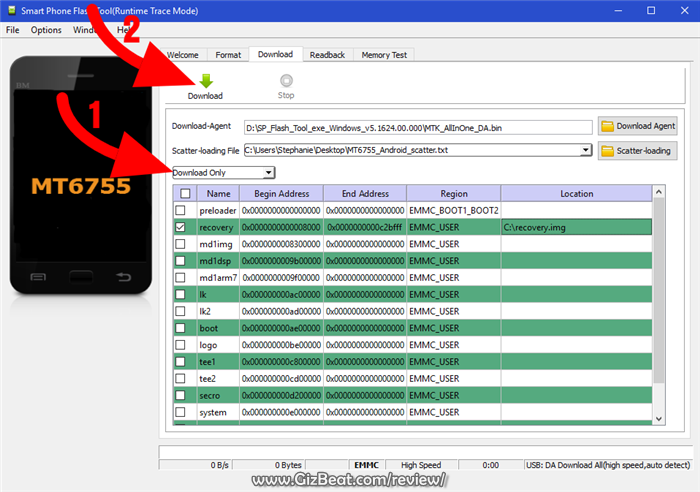
    umi-super-root-umi-super-twrp-13

    • Make sure the phone is disconnected from PC and that your phone is powered off.
    • Make sure the box noted in the image above says ‘Download Only’
    • Select ‘download’ from the top of SP Flash Tools.
    • Connect USB cable to phone. Within a few seconds you should see a red bar come up. Wait a few more seconds and the flash should begin.
    • It will all be over in just a few seconds, at which point you should see a dialog from SP Flash Tools telling you the flash is complete.flash-okay-sp-flash-tool

    8. Boot into UMi Super TWRP recovery and root

    • Disconnect your UMi Super from the PC.
    • Hold VolumeUp+Power until you see the UMi Super logo show, then release Power, but continue holding VolumeUp until you see the UMi Super booted into TWRP.
    • Flash / Install SuperSU.zip from the UMi Super Root pack.

    Done! Good job. You now have TWRP and a rooted UMi Super MT6755.

    If you have any issues, comments, successes or failures, or just want to say thanks, please comment in the comment section and let us know.

  • How to change KingRoot to SuperSU on Meizu M3 Note MT6755 Helio P10

    How to change KingRoot to SuperSU on Meizu M3 Note MT6755 Helio P10

    For many users, one of the only options for rooting is KingRoot. Unfortunately KingRoot doesn’t work with all apps. The main purpose of this change KingRoot to SuperSU guide is (more…)

  • Change official Meizu M3 Note China ROM to Global International firmware corrupt

    Change official Meizu M3 Note China ROM to Global International firmware corrupt

    If you’re trying to root MT6755 Helio P10 Meizu M3 Note and/or change your MT6755 MTK6755 Helio P10 Meizu M3 Note to the International / Global 5.1.3.3G 5.1.3.2G 5.1.3.1G 5.1.3.0G Meizu M3 Note ROM from 5.8.99.0G or from Chinese ROM 5.1.3.1A / 5.1.3.2A / 5.1.3.3A / 5.1.3.4A and you’re getting a “firmware corrupt” notification in recovery, you’ve come to the right guide. (more…)

  • Guide how to root Meizu M3 Note root guide tutorial

    Guide how to root Meizu M3 Note root guide tutorial

    One of the beautiful things about root Meizu M3 Note rooting is that it comes pre-rooted. To gain root permissions on the Global 5.1.3.2G ROM Meizu M3 Note with Helio P10 MT6755 MTK6755, follow this is root guide.

    (more…)

  • MT6737T MTK6737T Asus Pegasus 3 Asus X008D preview

    MT6737T MTK6737T Asus Pegasus 3 Asus X008D preview

    Featuring the new MT6737T SoC is the Asus Pegasus 3 X008D. Recently previewed was MediaTek’s latest SoC MT6737 MTK6737T. These SoC are the followup to the well regarded MT6735. This phone is the new iteration of budget Asus Pegasus 2.

    asus-pegasus-3-review-mtk6737t-454

    ComponentSpec
    SoCMT6737 MTK6737
    CPU64-bit 4-core [email protected]
    GPUMali-T720
    Display5.2″@720p IPS
    RAM2GB
    ROM16GB (10GB for user)
    Rear camera12MP
    Front camera5MP
    CompassYes
    OSAndroid Marshmallow
    Fingerprint sensorYes

    Asus has made a move away from Intel and onto Qualcomm with their new Asus Zenfone 3 lineup, but with this latest budget offering of Asus Pegasus 3 X008D, they’ll be using the latest MTK budget SoC– MT6737T.

    MT6737T is very good and can be considered a step above the Qualcomm Snapdragon 4xx series, and in some ways matches or exceeds the performance of Snapdragon 615.

    The Pegasus 3 will also carry 2.5D Arc front glass. The official Asus announcement will be forthcoming on June 15th.

    Read more about MT6737 and MTK6737T here.

  • Xiaomi Mi5 unbrick after bricked from failed edl flash method 2

    Xiaomi Mi5 unbrick after bricked from failed edl flash method 2

    Many users have bricked their Xiaomi Mi5. This unbrick Xiaomi Mi5 guide has helped many users come back from a Xiaomi Mi5 brick, even with a locked bootloader. (more…)

  • Change to Global Xiaomi Mi5 ROM from 7.2.8.0 or CN ROM and unbrick Xiaomi Mi5 bricked from edl flash

    Change to Global Xiaomi Mi5 ROM from 7.2.8.0 or CN ROM and unbrick Xiaomi Mi5 bricked from edl flash

    This guide / tutorial / how-to will help you flash upgrade Xiaomi Mi5 7.2.8.0 vendor, or 7.3.2.0 / 7.3.3.0 / 7.3.4.0 / 7.3.10.0 China ROM, to Xiaomi Mi5 Global Stable ROM 7.3.5.0 or to Xiaomi Mi5 Global Developer ROM 6.5.3.0. The beautiful part is that you don’t even need an unlocked boot loader.

    This Xiaomi Mi5 guide will actually help you flash to any SD update ROM. So if for some reason you want to go to the latest Xiaomi Mi5 China ROM or Xiaomi Mi5 China Developer ROM from Global or Vendor ROM, you can also use this guide.

    This Xiaomi Flash tutorial guide should also help with any Xiaomi phone. It’s not limited only to Xiaomi Mi5.

    Unbrick Xiaomi Mi5 no edl fastboot recovery locked bootloader

    If you’re finding this Xiaomi Mi5 flash guide before you’ve bricked, you’re in luck. However, many people have arrived here due to being bricked from trying to flash Xiaomi Mi5 with a locked bootloader in edl mode.

    Many users have used this exact same tutorial to unbrick their locked bootloader Xiaomi Mi5 and Xiaomi Redmi Note 3 Pro. Particularly people who tried to flash Xiaomi Mi5 in edl mode. Xiaomi has disabled edl in later versions, but in earlier versions and the 7.2.8.0 vendor version it still exists. However, this guide has not worked for everyone to unbrick Xiaomi Mi5. We have another unbrick Xiaomi Mi5 tutorial coming up that should help you if this one fails.

    1. Download Xiaomi Global ROM

    The first step is to download your ROM of choice. That can be done here (opens in new tab): Official Xiaomi ROM Downloads

    2. Download and run the latest China Xiaomi Mi PC Suite

    Click here to download latest Mi Phone Suite Chinese version (direct download for Official Mi Xiaomi PC Phone Suite Installer). The installer is very small, only about 2MB. After downloading and running, make sure you allow any permissions it requests.

    It will then download the latest Chinese language version of Mi PC Phone Suite, which is about 42MB total.

    After downloading and installing, it will autorun. Let it go ahead and do that.

    3. Prepare your phone

    Don’t plug your Xiaomi mobile into the USB yet. Power down your phone if it’s not already powered down. Then hold VolumeUp+Power button. You will see the Mi Logo, then it should show a pic of your phone with a USB cable unplugged from it.

    4. Select the download

    Connect one end of the USB cable to your Xiaomi Mi5 mobile phone, then while holding SHIFT on your PC, plug the other end into your computer’s USB port.

    You should then see a Windows explorer window popup. Direct it to your Xiaomi Mi5 ROM download from the previous step. This needs to be an SD update type ROM, *not* a fastboot type ROM.

    Go ahead and select the previously downloaded ROM by double clicking it, or clicking it once then clicking “Open”.

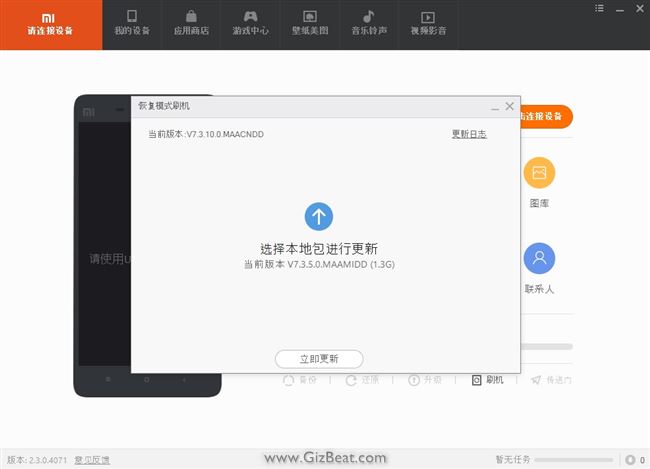
    5. The SD update ROM flash initializes

    xiaomi-mi5-unbrick-locked-bootloader-447

    You will see a circle going round and round. After 10-30 seconds you should see your current ROM version come up in the upper-left hand corner of Mi PC Phone Suite. Then about 10-30 seconds later will see an approval button show up. This is all in Chinese, but more or less it’s asking if you’re sure you want to proceed. Go ahead and press the button.

    6. The ROM flash

    xiaomi-mi5-unbrick-locked-bootloader-442

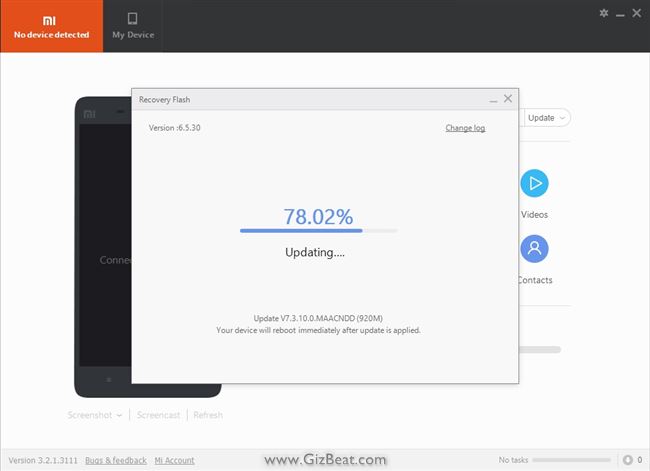
    After initiating the Xiaomi Mi5 ROM flash, you will see the meter start at 50%. This is normal. After another 30 seconds or so you will also see a bar slowly start to make its way across the bottom of your Xiaomi Mi5 phone.

    The bar will move very slowly. In our case, the bar on the PC remained at 50% until the bar on the phone hit about 65%, which was after about 15 minutes or so.

    Once the bar on the phone hits about 65%, you should start to see the PC bar extremely slowly begin to creep upwards a fraction of a % at a time. The bar on the phone will hit 100% when the PC bar is far from finished.

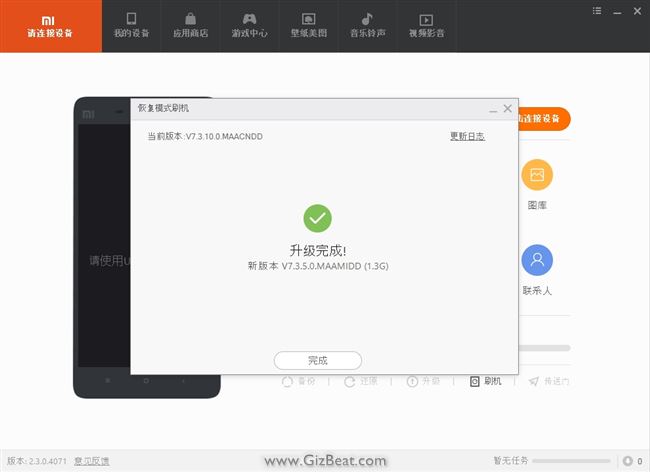
    xiaomi-mi5-unbrick-locked-bootloader-449

    When you see this message, or you see your phone has rebooted, you’re good to disconnect.

    Possible error messages and problems

    If you’re bricked and this didn’t work for you, give this tutorial a try.

    It took us 6 tries before the flash finally went through successfully. Some people are lucky and get it on the first go. Others not so lucky. The trick here is perseverance.

    The first issue we encountered was the Mi Phone Suite PC bar never went forward. It remained at 50% until well after the bar on the phone had hit 100%. Whether it would have actually completed regardless is unknown, however we decided to remove the USB cable and start the process over again. NOTE: this should not brick you. If you remove the cable before finished it will just stop, and your old ROM will still boot.

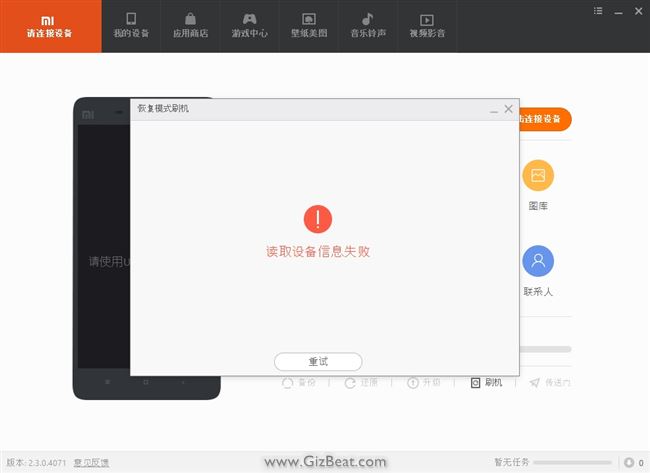
    Whether it’s the bar not moving forward, or whether you’ve received an error message similar to the image below, the solution is to try try try again. This includes powering down the phone again and restarting the Xiaomi Mi PC Phone Suite.

    xiaomi-mi5-unbrick-locked-bootloader-445

    Good luck! Should you have any issues, problems or concerns, or if this guide helped you out, let us know in the comments.

    [toggle title=’How to share this Guide on a forum or blog. Click here’]
    If you wish to share this guide on a blog, sharing the direct link to this GizBeat post is always best.

    If just a link won’t work for you, you may include the full or partial text, and images, in your blog or in a forum, but you must include the following:

    In a blog:

    Re-posted with permission from:
    <a href="http://www.gizbeat.com/10368/change-to-global-xiaomi-mi5-rom-from-7-2-8-0-or-cn-rom-and-unbrick-xiaomi-mi5-bricked-from-edl-flash/" target="_blank" rel="follow">GizBeat.com</a>

    In a forum:

    Re-posted with permission from:
    http://www.gizbeat.com/10368/change-to-global-xiaomi-mi5-rom-from-7-2-8-0-or-cn-rom-and-unbrick-xiaomi-mi5-bricked-from-edl-flash/

    [/toggle]

    Full Xiaomi Mi5 review here

  • 10 top mobiles. China phone Xiaomi Mi5 comes in 1st

    10 top mobiles. China phone Xiaomi Mi5 comes in 1st

    Xiaomi along with Snapdragon 820 MSM8996 heralds the Mi5 as the most powerful consumer mobile in the universe. (more…)

  • New Google tech makes gigapixel virtual art museum

    New Google tech makes gigapixel virtual art museum

    Going to a real museum is so 2010. The project by Google dedicated to putting a bit of culture in your day just got a big boost from new technology. (more…)

  • New MediaTek SoC MT6737M MTK6737 vs MTK6737T update to MTK6735

    New MediaTek SoC MT6737M MTK6737 vs MTK6737T update to MTK6735

    Just announced is MT6737M MT6737 MTK6737. This is MTK MediaTek’s latest update to the very popular MTK6735. (more…)

  • $60 Touch-ID HomTom HT17 specs preview MT6737

    $60 Touch-ID HomTom HT17 specs preview MT6737

    China brand HomTom has announced by HomTom official their latest mobile– HomTom HT17.

    HomTom is a one of the newest brands out, but we yet have anything bad to hear about them.

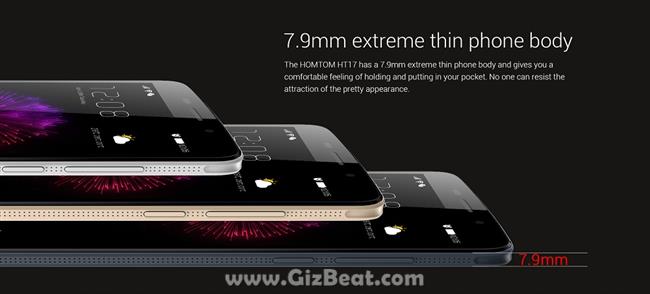
    homtom-ht17-review-2

    HomTom HT17 review specs

    • Display: 5.5 inch 1280 x 720 IPS
    • SoC: MT6737 MTK6737
    • CPU: 4-core [email protected]
    • GPU: Mali-T720MP2
    • System: Android 6.0
    • RAM + ROM: 1GB RAM + 8GB ROM.
    • TF-SD expandable: Yes (up to 128GB)
    • OTG: Yes
    • Dual-SIM: Yes
    • Touch-ID: Yes
    • Cameras: Front 2MP (SW 5MP) + Rear 8.0MP (SW 13.0MP) with LED flashlight
    • Sensors: Gravity sensor, Proximity sensor
    • Bluetooth: 4.0
    • 2G: GSM 850/900/1800/1900MHz
    • 3G: WCDMA 900/2100MHz
    • 4G: FDD-LTE 800/1800/2100/2600MHz
    • Battery: 3000mAh

    This is the first official mobile to carry the latest budget SoC from MediaTek / MTK. The MT6737 is an update to MT6735.

    Interestingly, the HomTom HT17 has Touch-ID. This in itself isn’t so interesting, but combined with the fact that the phone selling for $60 makes it a minor miracle. Usable Touch-ID, once reserved for $600 flagships is now coming in phones costing just a fraction of that.

    homtom-ht17-review-2

    We also see it has a relatively large battery at 3000mAh. Combined with the 720P display should provide 5-6 hours onscreen throughout the day for most users.

    Another plus is that the HomTom HT17 also has the option to add a TD SD card up to 128GB.

    It all looks great, a $60 mobile with a good sized battery, Touch-ID and Android 6. Doesn’t get much better than this. HomTom has shaken things up in the budget sector and we’re looking forward to seeing what else they bring to the table in 2016.