Washington looks on in fear, as China’s grip on the world tightens. (more…)
Blog
-

Ultimate Blackview BV8000 Pro root and Helio P20 root TWRP guide
For those looking to root their Blackview BV8000 Pro, the first step is to install TWRP custom recovery on the Blackview BV8000 Pro. The process contains quite a few steps, but most of them take just a few seconds.
If it looks daunting, don’t worry, take each step one by one and you’ll come through with a rooted Blackview BV8000 Pro within just a few minutes.
1. Download
- MTK MediaTek auto preloader drivers #1 pack– These are the drivers that will allow the MTK SP Flash Tool to communicate with your mobile. Try these drivers first, as they may eliminate the need to disable Windows driver signing. If you have any issues then use the #2 pack.
- MTK MediaTek auto preloader drivers #2 pack – These are the drivers that will allow the MTK SP Flash Tool to communicate with your mobile. You made need to disable Windows driver signing enforcement (see video).
- Download latest SP Flash Tool – This is the tool that will be used to flash Blackview BV8000 Pro with TWRP
- Blackview BV8000 Pro root pack – This pack includes the Blackview BV8000 Pro TWRP, Blackview BV8000 Pro stock recovery, Blackview BV8000 Pro stock boot, SuperSU.zip, and Blackview BV8000 Pro scatter file download (MT6757_Android_scatter.txt).
[spoiler style=”steelblue” collapse_link=”false” title=”KNOWLEDGE POINT about scatter files. Click here to read”]NOTE: A scatter file is what tells SP Flash Tool where to flash various parts of the firmware on your phone’s EMMC.[/spoiler]
2. Install MediaTek MT6757 Helio P20 preloader drivers
If you don’t already have MTK Preloader Drivers installed, we’ll go through that step now. NOTE: If you get an unsigned driver error and can’t continue with the driver install, then go to step #3. NOTE: Use #1 pack or #2 pack. Do not need to use both.
[spoiler style=”steelblue” collapse_link=”false” title=’If MTK MediaTek preloader vcom driver pack #1, click here’]
- Open the MTK adb vcom auto install driver pack #1 in WinRAR / unZip
- No need to extract, double click DriverInstall.exe or installdrv64.exe for x64 bit Windows
- Allow any permission requests
[spoiler style=”steelblue” collapse_link=”false” title=’If MTK MediaTek preloader vcom driver pack #2, click here’]
- Open the MTK MediaTek auto vcom driver install pack #2, and go to Win7_WinXP folder for 7 / XP, or Win8 folder for Windows 8 / Windows 10.
- No need to extract, double click DriverInstall.exe
- Allow any permission requests
- When you see “Windows can’t verify the publisher of this driver software”, click “Install this driver software anyway”
- At the end you shoold see something like this[/spoiler]
3. Turn off driver signature enforcement
Do this step if:
- You don’t already have MediaTek preloader drivers installed
and
- Getting error from Windows telling you drivers are unsigned and can’t be installed with pack #1 or pack #2
[spoiler style=”steelblue” collapse_link=”false” title=’Click for disable driver signature enforcement guide’]
To install preloader drivers, some users of 64-Bit Windows may need to disable Driver Signature Verification / Enforcement. This quick procedure will have you up and modding your phone in no time.
- Hold SHIFT while left-clicking restart. It’s the same for Windows 8.1 and Windows 10.
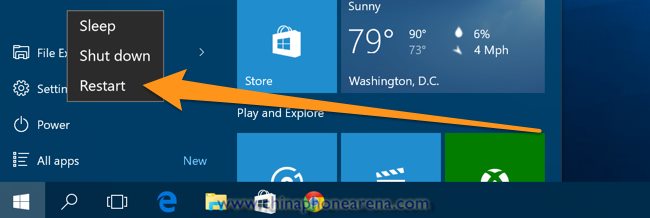
- Your computer will reboot and give you various options. Select “Troubleshoot”.

- Choose “Advanced options”.

- Choose “Startup settings”.
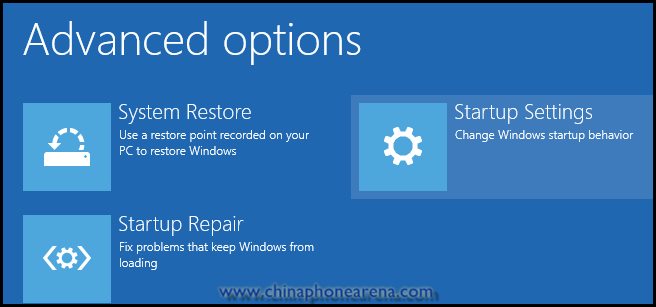
- Select “Restart”.
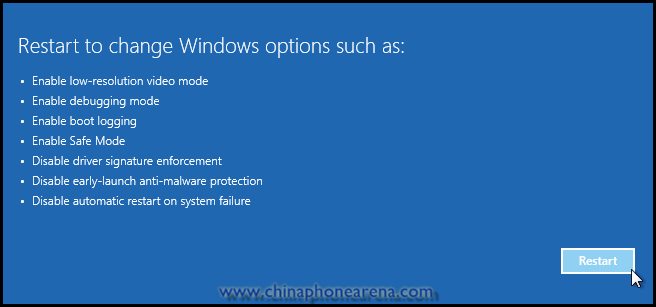
- Select “Disable driver signature enforcement”.

Your computer will now reboot into a mode which will allow you to install unsigned drivers, which is covered in the next steps.[/spoiler]
4. Install and run SP Flash Tool
- After downloading the latest SP Flash Tool, extract it to a directory where you’ll know where it’s at.
- Go to the extracted folder.
- Right-click ‘flash_tool.exe’ and ‘Run as administrator’
5. Copy SR1-SuperSU.zip from the root pack to the base of your phone, or to an SD card in your phone
6. Load the Blackview BV8000 Pro scatter
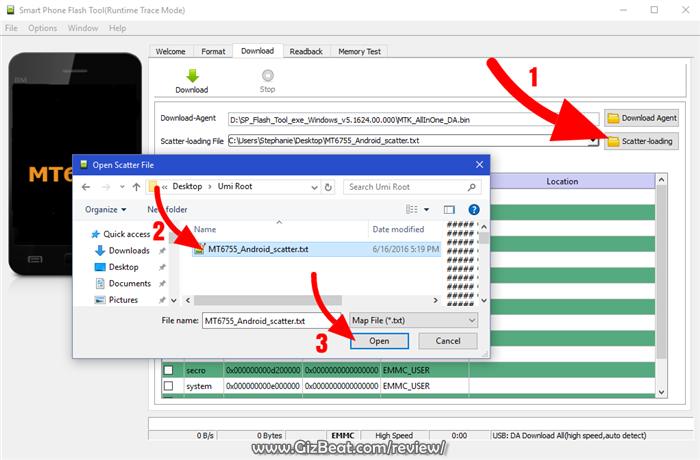
- If you haven’t already done so, extract the Blackview BV8000 Pro TWRP and root pack to a folder where you’ll know where it’s at.
- Select ‘scatter-loading’ from upper-right of SP Flash Tools.
- Navigate to the folder that you extracted the Blackview BV8000 Pro TWRP pack to
- Select ‘MT6757_Android_scatter.txt’
- A checklist of different parts of the ROM shoold then show in the bottom portion of SP Flash Tools.
7. Select the Blackview BV8000 Pro TWRP custom recovery
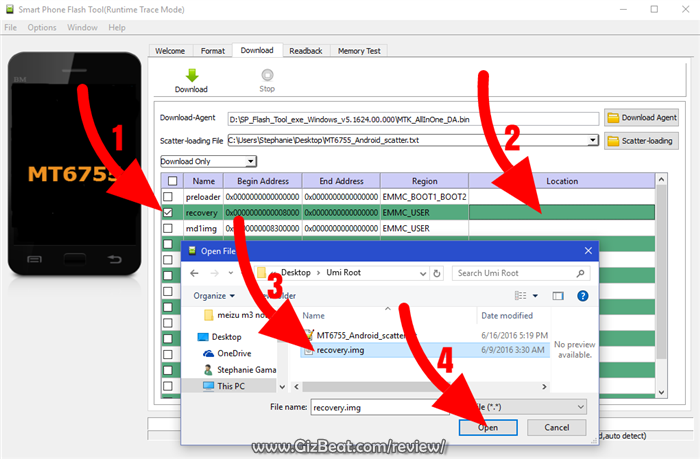
- If anything is selected besides ‘recovery.img’, deselect them all except ‘recovery.img’
- Double click the ‘recovery.img’ line in MTK SP Flash Tool (see video at 02:00)
- direct SP Flash Tool to the previously extracted Blackview BV8000 Pro TWRP (‘recovery.img’ in the Blackview BV8000 Pro TWRP pack)
8. Flash Blackview BV8000 Pro TWRP
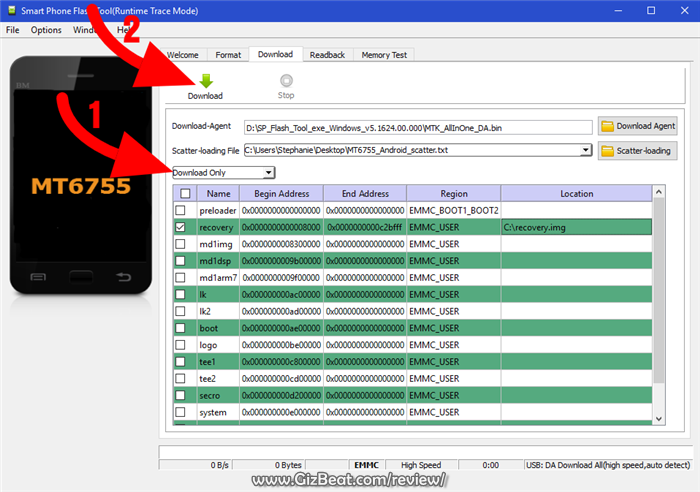
- NOTE: In the video above, I am flashing BOOT, not RECOVERY. The process is the same, but you will be flashing RECOVERY. Make sure to use “DOWNLOAD ONLY”, not “FIRMWARE UPGRADE” or “FORMAT+DOWNLOAD”
- Make sure the phone is disconnected from PC and that your phone is powered off.
- Make sure the box noted in the image above says ‘Download Only’
- Select ‘download’ from the top of SP Flash Tools.
- Connect USB cable to phone. Within a few seconds you shoold see a red bar come up. Wait a few more seconds and the flash shoold begin.
- It will all be over in just a few seconds, at which point you shoold see a dialog from SP Flash Tools telling you the flash is complete.

- If any errors, repeat the process but hold VolumeUp as you connect the phone and keep it held for several seconds after connecting.
9. Boot into Blackview BV8000 Pro TWRP recovery and root
- Disconnect your Blackview BV8000 Pro from the PC.
- Hold VolumeUp+Power until you see the Blackview BV8000 Pro logo show, then release Power, but continue holding VolumeUp until you see the Blackview BV8000 Pro booted into TWRP.
- Flash / Install SR1-SuperSU.zip that you previously copied to your phone.
Done! Good job. You now have TWRP and a rooted Blackview BV8000 Pro MT6757.
If you have any issues, comments, successes or failures, or just want to say thanks, please comment in the comment section and let us know.
-

Meizu Pro 7 Plus has dual AMOLED displays and dual Sony IMX368
Meizu, one of the longest running China brands, and know for putting out phones with quality hardware, is releasing a groundbreaking new phone– Meizu Pro 7 Plus. (more…)
-

Incredible. New Blackview BV8000 Pro supports true Global 4G LTE and 3G
The just released Blackview BV8000 Pro supports an incredible number of bands. Equivalent to what you would normally need to pay twice as much to get. This is one of the first few phones which support a near full array of the most important bands to make it truly Global.
This includes North America, as it supports bands 2, 4, 5, 12, 17, which make it 100% comp (more…)
-

Teardown of Doogee Mix shows MT6757CH, not MT6757T
Summary
- User furmanoff has done a teardown of Doogee Mix and found “MT6757V” imprinted on the SoC (more…)
-

Guess which is which. Doogee Mix goes up against Samsung S5K3L8 Xiaomi Redmi Note 4 camera
While having the Doogee Mix on hand, I thought I’d take the chance to pit it against the very good Xiaomi Redmi Note 4. (more…)
-

Are phone cameras good enough?
Due to a vast improvement in camera quality over the last few years, many people have let go of standalone cameras altogether. (more…)
-

Google DeepMind artificial intelligence learns to jump, run, and crawl
Machines learn and work in much the same way as a person or a pet sometimes learns– by receiving rewards, also known as Reinforcement Learning (RL). That is, when a proper or desired behavior is produced, a reward is given. This is what Google is using to teach their DeepMind AI. (more…)
-

Kalashnikov will produce a 20 ton drone robot tank for the Russian army
Summary
- Kalashnikov is making a new drone tank 3 times the size of the already produced BAS-01G Soratnik
Kalashnikov has announced plans to make a 20-ton drone tank for the Russian Army. Kalashnikov manufacturers vodka, souvenirs, clothing, accessories and video games, but are typically known as an assault rifle manufacturer. Kalashnikov named their business after the well known AK-47 rifle.
This won’t be their first foray into drone tanks. The first model, the BAS-01G Soratnik tank, travels at up to 25mph, weighs seven tons, and can fit a 7.62mm Kalashnikov PKTM machine gun, or a 12.7mm heavy machine gun, grenade launchers and up to eight Kornet guided missiles with a range of three miles.

BAS-01G Soratnik tank facts
- in Russian, Soratnik means “comrade-in-arms”
- was designed to fit the needs of the Russian Ministry of Defense who requested a machine which could assist humans in combat
- travels up to 25mph / 40kph
- weighs seven tons
- can be fitted with various combinations of machine guns, missiles and grenade launchers
- can be controlled from up to 6m / 10km away
- can perform various tasks on its own without human intervention
The new 20-ton tank will be 3 times the size of the Soratnik, with similar capabilities that will scale up with size. In other words, we expect the new monster tank robot to be able to carry significantly more weaponry.

It’s rumored that the new Russian beast will be on par with the U.S. Army’s .M1126 Stryker ICV (pictured above.)
-

How to fix or replace unknown IMEI with SN Write Tool
Often after flashing a ROM through Firmware Upgrade, or Format and Download, with SP Flash Tool on MediaTek MTK phones, we lose our NVRAM and IMEI information. Today we’re going to show you how to reflash your IMEI you have IMEI Unknown in About Phone, or if your SIM card isn’t recognized due to missing IMEI.
The process is rather simple. If it looks confusing, just take it step by step and you’ll find it’s quick and easy.
Likely you already have the VCOM drivers installed if you’ve flashed and lost IMEI, but if for some reason you don’t have USB VCOM MTK MediaTek drivers installed, follow the steps in the spoiler here.
[spoiler title=”Install VCOM drivers”]
- Download the driver pack
- Hold SHIFT while clicking RESTART in Windows
- Select Troubleshoot
- Click Advanced Options
- Click Startup Settings
- Click Restart
- Click “Disable driver signature enforcement”
Now that Windows is rebooted:
- Double click DriverInstall.exe in the downloaded archive from above
- Follow the prompts to install
- Reboot
[/spoiler]
Flash IMEI to your MTK phone
Get SN Writer downloaded and opened
- Download the SN Writer Tool
- Open the archive with WinRAR or similar unarchive utility
- Extract the folder to a location where you’ll be able to find it
- Go to the extracted folder and double-click SN Writer.exe
Set options
- ComPort should be “VCOM”
- If you have a Chinese brand MTK phone, select “Smart Phone”
- Click System Config
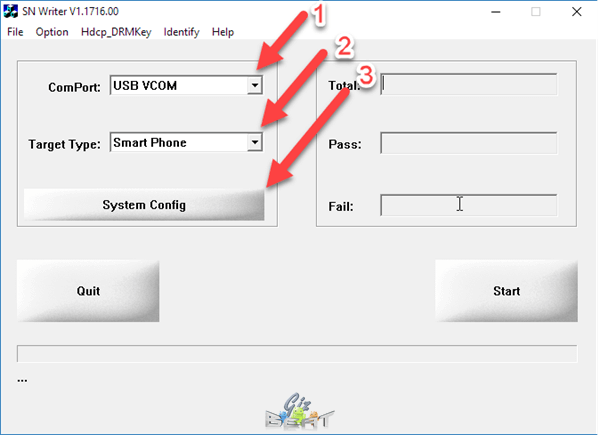
Set system configuration
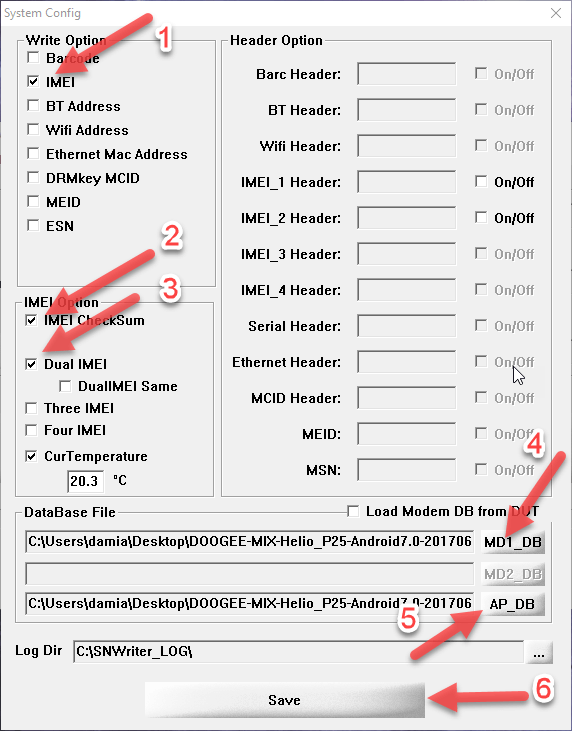
- In the upper-left box, uncheck all except for “IMEI”
- In the next box down, IMEI options, check “IMEI checksum”
- If you have a dual-SIM phone, check “Dual IMEI”. If you want the IMEIs to be different for each slot (normal), then uncheck “DualIMEI Same”
- In the bottom-right corner you will see MD1_DB. This is the Modem Database file. Go ahead and click that box and navigate to the ROM for your phone
- Look for a file with a long string of letters and numbers. It may be in the base of the ROM folder, or it may be in a sub-folder within the ROM folder. It should start with “MD”
- Select the AP_DB file. This is similar looking to the MDDB file, but will begin with “APDB”
- Click “Save”
- Power off your phone
Begin the IMEI flash
In SN Write Tool, click “Start”. A box will pop up asking for your IMEI
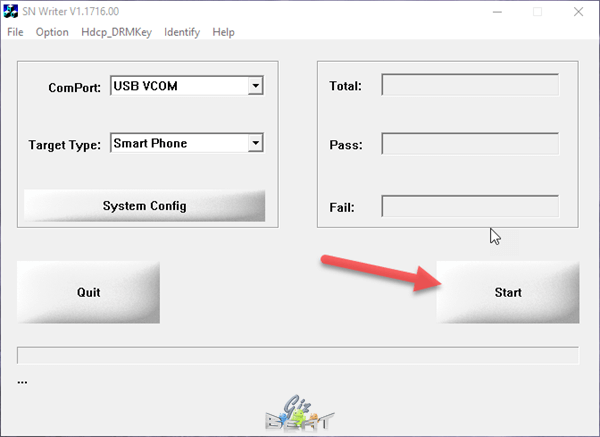
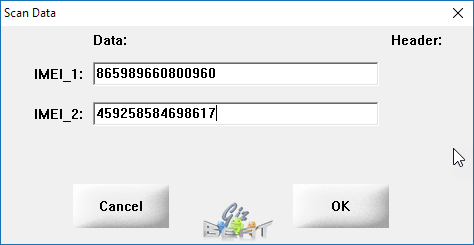
Enter them from the back of the box, or if you’ve lost them, go ahead and generate some random ones and click “OK”
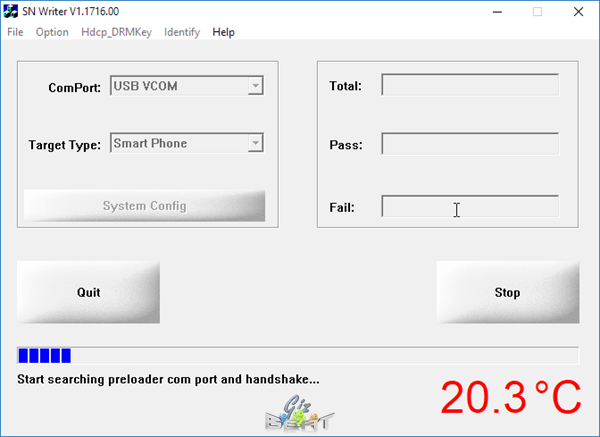
Connect your phone via USB and the process should begin. Some phones may require you to hold Volume Up prior to connecting to trigger the VCOM driver to begin the flash
That’s it. Seems like a lot of steps, but we break down each individual step to make it easier for some users to understand. Please let us know your results, comments and questions in the comments below.
-

Days to explode above 35C / 95F if we don’t follow the Paris Accord
Days above 95F / 35C are set to increase drastically worldwide over the next few decades. This puts both people and crops at danger, and puts a strain on electricity grids as we struggle to adapt to the hotter weather. (more…)
-

Chinese OnePlus 5 beats iPhone 7
The Chinese OnePlus 5 has scored an 87, which is 3 points below the top spot in DxOMark Mobile testing. (more…)


